Having trouble getting your Windows 10 to recognize your printer? Look no further! In this article, we will delve into the common reasons behind the frustrating issue of Windows 10 being unable to detect or find your printer. Stay tuned for some practical solutions to get your printing back on track!
Troubleshoot printer connectivity
If your Windows 10 PC can’t detect or find your printer, here are some troubleshooting steps you can try:
1. Check the printer’s connectivity:
– Make sure the printer is turned on and connected to your network or computer.
– If it’s a network printer, verify that it’s connected to the same network as your PC.
– For USB printers, ensure the cable is securely connected to both the printer and your PC.
2. Update printer drivers:
– Open the Device Manager and expand the Printers category.
– Right-click on your printer and select “Update driver.”
– Follow the on-screen instructions to download and install the latest drivers.
3. Run the Printer Troubleshooter:
– Type “troubleshoot” in the Windows search bar and select “Troubleshoot settings.”
– Scroll down and click on “Printer” under “Find and fix other problems.”
– Follow the prompts to run the troubleshooter and apply any recommended fixes.
4. Reset the print spooler:
– Press the Windows key + R to open the Run dialog box.
– Type “services.msc” and press Enter.
– Scroll down and find the “Print Spooler” service.
– Right-click on it and select “Restart.”
5. Check network settings:
– In the Windows search bar, type “Network status” and select “Network status settings.”
– Click on “Network troubleshooter” and follow the instructions to diagnose and fix any network issues.
If these steps don’t resolve the issue, you may need to consult your printer’s manual or contact the manufacturer for further assistance.
Add a printer to Windows 10
If Windows 10 can’t detect or find your printer, there are a few methods you can try to fix the issue. First, make sure your printer is connected to your computer and turned on. Then, try these steps:
1. Open the Settings app and go to Devices > Printers & scanners.
2. Click on “Add a printer or scanner” and wait for Windows to detect your printer.
3. If your printer is not found, click on “The printer that I want isn’t listed” and follow the on-screen instructions.
4. You can also try using the “Add a device” feature in the Control Panel.
5. If none of these methods work, try updating your printer drivers through Windows Update or the manufacturer’s website.
For more detailed instructions and additional solutions, check out our article on Windows 10 printer problems by Ivan Jenic and Alex Serban.
Update printer drivers
If Windows 10 is unable to detect or find your printer, there are a few steps you can take to update the printer drivers and resolve the issue.
First, ensure that your printer is properly connected to your computer, either through a USB cable or over a network connection.
Next, open the “Device Manager” by searching for it in the Windows search bar. Locate your printer under the “Printers” section and right-click on it. Select “Update driver” and choose the option to automatically search for updated drivers.
If this doesn’t work, you can manually download the latest drivers from the manufacturer’s website and install them.
Remember to also check for any Windows updates that may include printer fixes.
powershell

# Stop and start the Print Spooler service

Stop-Service -Name Spooler -Force

Start-Service -Name Spooler
# Clear pending print jobs
$printSpooler = Get-Service -Name Spooler
if ($printSpooler.Status -eq 'Running') {
$printJobs = Get-WmiObject -Query "SELECT * FROM Win32_PrintJob"
if ($printJobs.Count -gt 0) {
foreach ($printJob in $printJobs) {
$printJob.Delete()
}
Write-Host "Pending print jobs cleared."
} else {
Write-Host "No pending print jobs found."
}
} else {
Write-Host "Print Spooler service is not running."
}
Uninstall recent Windows updates
If your Windows 10 is unable to detect or find your printer after recent updates, there are a few steps you can take to resolve the issue.
First, try uninstalling the recent Windows updates that may have caused the problem. To do this, follow these steps:
1. Press the Windows key + X on your keyboard and select “Settings” from the menu.
2. In the Settings window, click on “Update & Security.”
3. Select “Windows Update” from the left-hand side menu.
4. Click on “View update history.”
5. Click on “Uninstall updates” at the top of the page.
6. Locate the recent updates that you suspect may have caused the printer issue, right-click on them, and select “Uninstall.”
After uninstalling the updates, restart your computer and check if your printer is now detected by Windows 10. If not, you may need to try other troubleshooting steps or seek further assistance from a professional.
Clear printer files
-
Open Printer Queue window:
- Press Windows key + R to open the Run dialog box.
- Type “control printers” and press Enter.
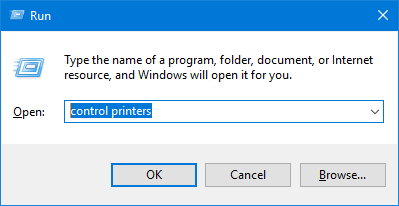
- The Devices and Printers window will open.
-
Clear print queue:
- Right-click on your printer and select “See what’s printing“.
- In the print queue window, click on “Printer” from the top menu.
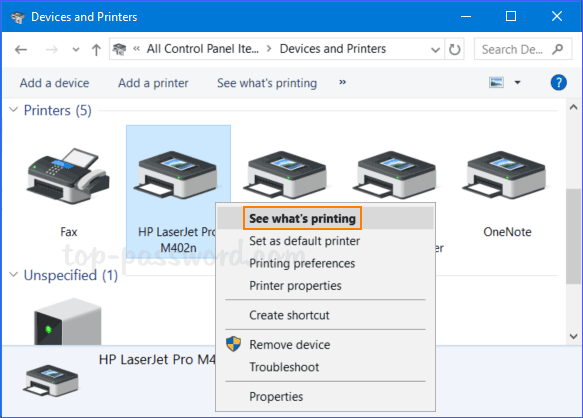
- Choose “Cancel All Documents“.
- Confirm the action by clicking “Yes“.
-
Restart the Print Spooler service:
- Press Windows key + R to open the Run dialog box.
- Type “services.msc” and press Enter.
- Scroll down to locate “Print Spooler“.
- Right-click on “Print Spooler” and select “Restart“.
-
Delete printer drivers:
- Press Windows key + X and select “Device Manager“.
- Expand the “Print queues” category.

- Right-click on your printer and choose “Uninstall device“.
- Follow the on-screen instructions to complete the driver uninstallation.
-
Reinstall printer drivers:
- Visit the printer manufacturer’s website.
- Search for the latest drivers for your specific printer model.

- Download and install the drivers according to the provided instructions.
Disable firewall for printer access
To disable the firewall for printer access on Windows 10, follow these steps:
1. Press the Windows key + R to open the Run dialog box.
2. Type control panel and press Enter to open the Control Panel.
3. In the Control Panel, click on System and Security.
4. Click on Windows Defender Firewall.
5. On the left side of the window, click on Turn Windows Defender Firewall on or off.
6. Select the option Turn off Windows Defender Firewall (not recommended) for both private and public networks.
7. Click OK to save the changes.
By disabling the firewall, you can allow your printer to connect to your Windows 10 device without any issues.