Having trouble with a stuck disk scan and repair on your Windows 10 computer? Learn how to fix it here.
Utilizing Windows Tools for Unstuck Scanning and Repair
1. Boot into Safe Mode: Restart your computer and press F8 repeatedly until the Advanced Boot Options menu appears. Select “Safe Mode” and press Enter.
2. Run CHKDSK: Press the Windows key + X and select “Windows PowerShell (Admin)” from the menu. Type chkdsk /f C: (replace “C” with the drive letter you want to scan) and press Enter. Follow the on-screen instructions to repair any issues.
3. Use Disk Cleanup: Press the Windows key + S and type “Disk Cleanup.” Select the drive you want to clean up and follow the prompts to remove unnecessary files.
4. Check for Malware: Run a full system scan using your preferred antivirus software to check for any malicious programs that may be causing issues.
5. Repair Windows System Files: Press the Windows key + X and select “Windows PowerShell (Admin)” from the menu. Type sfc /scannow and press Enter to scan and repair corrupted system files.
6. Update Windows: Make sure your Windows operating system is up to date by going to Settings > Update & Security > Windows Update.
Enhancing Drive Connectivity and Software Assistance
| Enhancing Drive Connectivity and Software Assistance |
|---|
| Article Title: Fix Windows 10 Disk Scan & Repair Stuck – How to Repair |
| Drive Connectivity: |
| 1. Check physical connections of the drive to ensure it is properly connected. |
| 2. Update drivers for the drive to ensure compatibility with Windows 10. |
| 3. Use disk management tools to troubleshoot and fix drive connectivity issues. |
| Software Assistance: |
| 1. Use built-in Windows tools like Disk Cleanup and System File Checker to fix software-related issues. |
| 2. Use third-party software like CCleaner or Auslogics Disk Defrag to optimize drive performance. |
Patience and Intervention in the Repair Process
- Wait for the scan and repair process to complete:
- It is important to allow the system to finish the disk scan and repair process before taking any further action.
- Restart your computer:
- Once the process is completed, restart your computer to see if the issue has been resolved.
- Check the disk for errors:
- Use the built-in Windows tool, CHKDSK, to check the disk for errors and repair any issues.
- Run a system file checker scan:
- Open Command Prompt as an administrator and run the command sfc /scannow to scan and repair system files.
- Perform a system restore:
- If the issue persists, consider performing a system restore to a point before the problem started.
Disabling Automatic Scans and Entering Safe Mode
To fix a stuck disk scan and repair in Windows 10, you may need to disable automatic scans and enter Safe Mode. This can help troubleshoot and resolve any issues that are causing the scan to get stuck.
Disabling Automatic Scans: To disable automatic scans in Windows 10, open the Command Prompt as an administrator. Type “chkntfs /x C:” (replace “C” with the drive letter you want to disable scanning for) and press Enter. This will prevent Windows from automatically scanning the drive at startup.
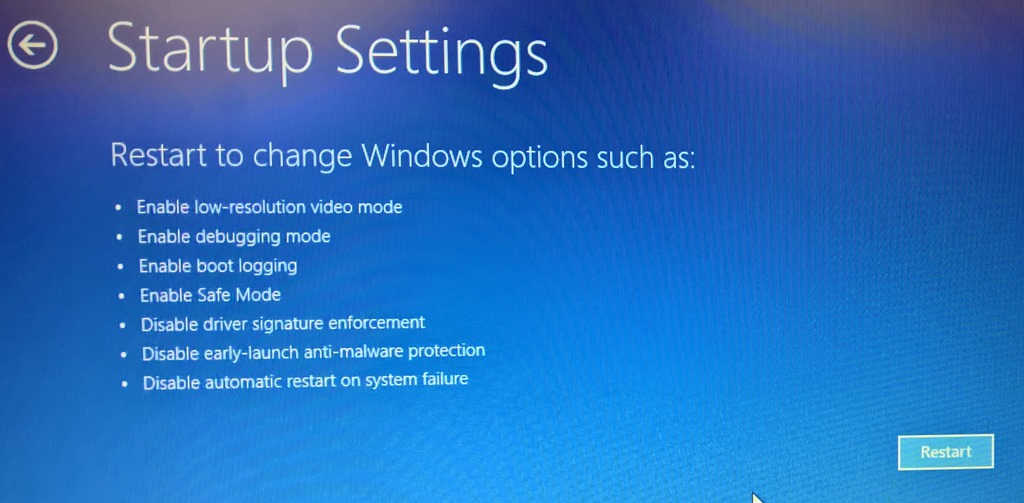
Entering Safe Mode: To enter Safe Mode in Windows 10, click on the Start menu and then click on the power icon. Hold down the Shift key and click on Restart. This will bring up the Advanced Boot Options menu. From there, click on Troubleshoot, then Advanced options, and then Startup Settings. Click on Restart, and when your computer restarts, press F4 to boot into Safe Mode.
Once you have disabled automatic scans and entered Safe Mode, you can try running the disk scan and repair again to see if the issue has been resolved. If the scan still gets stuck, you may need to consider other troubleshooting steps such as checking for malware, running disk checks using third-party software, or contacting Microsoft support for further assistance.
Data Recovery and Prevention Tips
1. Boot into Safe Mode: To troubleshoot the issue of Windows 10 disk scan & repair being stuck, try booting into Safe Mode. This can help isolate any potential software conflicts that may be causing the problem.
2. Run CHKDSK: Use the built-in Windows utility CHKDSK to scan and repair any disk errors. Open Command Prompt with administrative privileges and type “chkdsk /f /r” to start the process.
3. Check Disk Health: Utilize disk health monitoring tools like CrystalDiskInfo to check the overall health of your hard drive. Any signs of impending failure may require immediate action.
4. Update Device Drivers: Outdated or corrupted device drivers can also cause disk scan & repair to get stuck. Update your drivers through Device Manager or manufacturer’s website to ensure compatibility.
5. Backup Your Data: Before attempting any repair procedures, it’s crucial to backup your important data to prevent any data loss. Use an external hard drive or cloud storage for safekeeping.
6. Seek Professional Help: If the issue persists despite trying the above methods, consider seeking help from a professional data recovery service. They have the expertise and tools to recover data from even the most challenging situations.
F.A.Q.
What to do when Scanning and repairing drive is stuck?
When “Scanning and repairing drive” is stuck, you can try entering Safe Mode and running CHKDSK to fix disk errors like bad sectors and file system errors.
Why is CHKDSK stuck on Scanning and repairing drive 100?
CHKDSK may be stuck on “Scanning and repairing drive 100” due to file system errors, bad sectors on the hard drive, or fragmented data. It is recommended to try defragmenting the hard drive, running SFC and DISM scans to repair system files, using a third-party disk repair tool, and checking for bad sectors or cloning the hard disk as potential solutions.
How do I stop Scan and repair in Windows 10?
To stop Scan and repair in Windows 10, you can run Windows 10 in Safe Mode and use Command Prompt to enter “chkdsk x: /f” (replace “x” with the drive you want to scan) to stop the process.
Why does my PC always Scan and repair disc on startup?
Your PC is always scanning and repairing the disc on startup due to reasons such as faulty graphic card drives, improper system shutdown, or a corrupted hard drive. To fix this issue, you can try rolling back the drivers, running startup repair, using the CHKDSK command, and other solutions mentioned in this blog.