Having trouble removing a printer in Windows 10? Here’s how to force remove it.
Use Settings or Print Server Properties to Uninstall
To force remove a printer in Windows 10, you can use either the Settings or Print Server Properties. Here’s how to do it:
1. Using Settings:
a. Open the Settings app by pressing Windows key + I.
b. Click on “Devices” and then select “Printers & scanners” from the left sidebar.
c. Scroll down and select the printer you want to remove.
d. Click on the “Remove device” button.
e. A confirmation dialog box will appear, click on “Yes” to uninstall the printer.
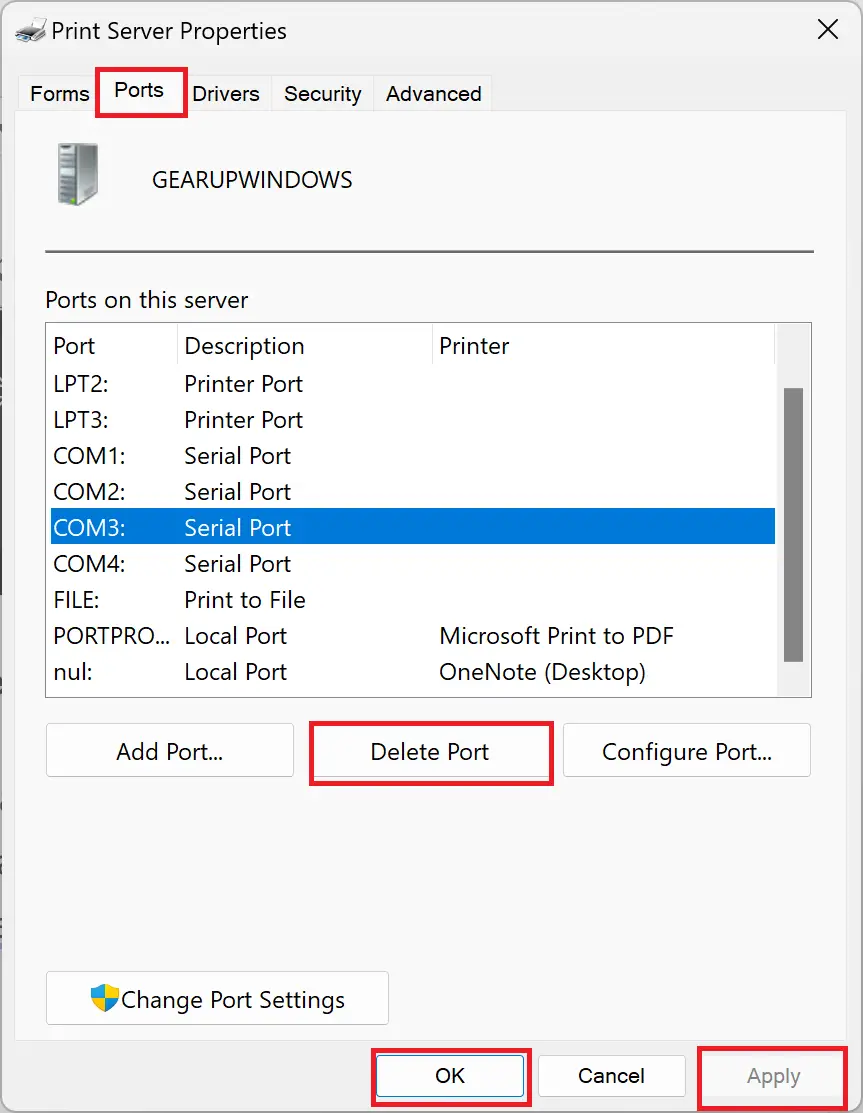
2. Using Print Server Properties:
a. Press Windows key + R to open the Run dialog box.
b. Type “printui.exe /s” (without quotes) and press Enter.
c. In the Print Server Properties dialog box, click on the “Drivers” tab.
d. Select the printer you want to remove and click on the “Remove” button.
e. A confirmation dialog box will appear, click on “Yes” to uninstall the printer driver.
Note: If you encounter any error messages during the uninstallation process, you may need to restart your computer and try again. It’s also recommended to double-check that you have administrative privileges on your Windows 10 device.
These methods should help you force remove a printer from your Windows 10 system.
Clear Print Jobs and Stop Spooler Before Removal
-
Open the Services Manager:
- Press the Windows key + R to open the Run dialog box.
- Type services.msc and press Enter.
-
Locate the Print Spooler service:
- Scroll down the Services list and find Print Spooler.
-
Stop the Print Spooler service:
- Right-click on Print Spooler and select Stop.
-
Clear print jobs:
- Open File Explorer by pressing the Windows key + E.
- Navigate to C:\Windows\System32\spool\PRINTERS.
- Delete all files in the PRINTERS folder.
-
Restart the Print Spooler service:
- Go back to the Services Manager.
- Right-click on Print Spooler and select Start.
Edit Registry and Remove Hidden Printers
![]()
To edit the registry and remove hidden printers in Windows 10, follow these steps:
1. Press the Windows key + R to open the Run dialog box.
2. Type “regedit” and press Enter to open the Windows Registry Editor.
3. In the Registry Editor, navigate to the following key: HKEY_LOCAL_MACHINE\SYSTEM\CurrentControlSet\Control\Print\Printers\
4. Under the Printers key, you will see a list of installed printers. Locate the printer you want to remove and right-click on it.
5. Select “Delete” from the context menu to remove the printer from the registry.
6. Close the Registry Editor.
After removing the printer from the registry, you may also need to remove the printer driver. Here’s how:
1. Press the Windows key + R to open the Run dialog box.
2. Type “printmanagement.msc” and press Enter to open the Print Management console.
3. In the Print Management console, expand the “Print Servers” node, then expand your computer’s name.
4. Right-click on the “Drivers” folder and select “Remove Driver Package” from the context menu.
5. Select the printer driver you want to remove and click “OK” to uninstall it.
Update or Uninstall Printer Drivers
1. Open the Control Panel (Windows) by pressing the Windows key + X and selecting “Control Panel” from the menu.
2. In the Control Panel, click on “Devices and Printers.”
3. Find your printer in the list of devices and right-click on it.
4. Select “Properties” from the drop-down menu.
5. In the Properties window, click on the “Hardware” tab.
6. Click on “Properties” again.
7. In the new window, click on the “Driver” tab.
8. To update the printer driver, click on “Update Driver.”
9. Choose whether you want to search automatically for updated driver software or browse your computer for driver software.
10. If you choose to search automatically, Windows will search for the latest driver software and install it for you.
11. If you choose to browse your computer, locate the updated driver file on your computer and follow the on-screen instructions to install it.
12. To uninstall the printer driver, click on “Uninstall.”
13. Follow the on-screen instructions to complete the uninstallation process.
14. If prompted, restart your computer to apply the changes.
Remember that updating or uninstalling printer drivers may require administrator privileges, so make sure you have the necessary permissions.
Use Print Management for Comprehensive Removal
| Step | Description |
|---|---|
| Step 1 | Open the Print Management console by pressing Windows Key + R, typing printmanagement.msc, and pressing Enter. |
| Step 2 | Expand “Print Servers” in the left pane, right-click on the print server, and select “Remove Server”. |
| Step 3 | Follow the on-screen instructions to remove the print server and all associated printers. |
| Step 4 | Restart your computer to complete the removal process. |
Address Access Denied and Driver in Use Issues
When trying to remove a printer in Windows 10, you may encounter two common issues: access denied and driver in use errors. Here’s how to address these problems:
Access Denied Issue:
1. Open the Control Panel by pressing the Windows key + R, typing “control panel,” and hitting Enter.
2. In the Control Panel, click on “Devices and Printers.”
3. Right-click on the printer you want to remove and select “Remove device.”
4. If you receive an “Access Denied” message, follow these steps:
a. Press the Windows key + R, type “regedit,” and hit Enter to open the Registry Editor.
b. Navigate to the following location: HKEY_LOCAL_MACHINE\SOFTWARE\Microsoft\Windows NT\CurrentVersion\Print\Printers.
c. Right-click on the printer you want to remove and select “Delete.”
d. Close the Registry Editor and try removing the printer using the Control Panel again.
Driver in Use Issue:
1. Press the Windows key + R, type “services.msc,” and hit Enter to open the Services Manager.
2. Scroll down and locate the “Print Spooler” service.
3. Right-click on it and select “Stop” to temporarily disable the service.
4. Open File Explorer, navigate to C:\Windows\System32\spool\PRINTERS, and delete all the files in this folder.
5. Go back to the Services Manager, right-click on the “Print Spooler” service, and select “Start” to re-enable it.
6. Now you should be able to remove the printer using the Control Panel.
F.A.Qs
How do I get rid of ghost Printers in Windows 10?
To get rid of ghost printers in Windows 10, you can follow these steps:
1. Open the Device Manager Console by typing “devmgmt.msc” and pressing Enter.
2. In the View menu at the top, click on “Show Hidden devices.”
3. Locate the printer that is a ghost and right-click on it.
4. Choose the option to uninstall the printer.
How do I force delete a print?
To force delete a print job, you can follow these steps:
1. Open the print queue by clicking on the printer icon in the taskbar or going to the Control Panel and selecting “Devices and Printers.”
2. Locate the print job that is stuck or not printing correctly.
3. Right-click on the print job and select “Cancel” or “Cancel All Documents.”
4. If the print job still doesn’t delete, you can try restarting the Print Spooler service. To do this, open the Services window by pressing Windows + R, typing “services.msc,” and hitting Enter. Scroll down and find the “Print Spooler” service, right-click on it, and select “Restart.”
5. If the issue persists, you may need to clear the print spooler files manually. To do this, open File Explorer and navigate to C:\Windows\System32\spool\PRINTERS. Delete all the files in this folder.
6. After completing these steps, try printing again to see if the issue is resolved.
How do I delete a document that won’t delete on my printer?
To delete a document that won’t delete on your printer, you can try clearing the print queue. Please follow the steps provided by GoTo Support at https://support.logmeininc.com/central/help/how.
How do I force delete a printer in Windows 10?
To force delete a printer in Windows 10, go to Control Panel > Hardware and Sound > Devices and Printers. From there, select a printer and access Print server properties. In the Drivers tab, choose the printer driver you want to remove from the Installed printer drivers list, and click Remove.