Are you encountering the “Please Insert Disk into Removable Disk” error with your USB drive? Here are 10 quick ways to fix this issue.
Understanding the “Please Insert a Disk” Error
Understanding the “Please Insert a Disk” error can be frustrating, but there are quick ways to fix it. First, make sure the USB drive is properly connected to the computer. If the error persists, try using a different USB port. If that doesn’t work, try using the USB drive on another computer to see if the issue is with the drive or the computer.
If the error still occurs, the drive may be faulty and needs to be replaced. Another option is to use disk management tools to format the drive and resolve any file system issues. If all else fails, consider seeking professional help for data recovery.
Common Causes of the Error
- Corrupted File System
- Open File Explorer
- Right-click on the removable disk and select Properties
- Go to the Tools tab and click on Check under Error checking
- Follow the on-screen instructions to repair the file system
- Outdated USB Drivers
- Open Device Manager by pressing Windows Key + X and selecting Device Manager
- Expand the Universal Serial Bus controllers section
- Right-click on the USB drive and select Update driver
- Choose Search automatically for updated driver software and follow the on-screen instructions to update the drivers
- Physical Damage to the USB Drive
- Inspect the USB drive for any visible physical damage
- If there is damage, consider sending the drive to a professional for repair
- Incorrect Registry Settings
- Open Registry Editor by pressing Windows Key + R, typing regedit, and pressing Enter
- Navigate to HKEY_LOCAL_MACHINE\SYSTEM\CurrentControlSet\Control\StorageDevicePolicies
- Double-click on WriteProtect and set the Value data to 0
- Click OK and restart the computer
Assigning a New Drive Letter
To assign a new drive letter to your USB drive, first, ensure that the drive is connected to your computer. Then, open the Command Prompt by searching for it in the Windows search bar. Once open, type diskpart and press Enter. Next, type list volume to display a list of all the volumes on your computer. Find your USB drive in the list and note its volume number.
Then, type select volume X (replace X with the volume number of your USB drive) and press Enter. Finally, type assign letter=Y (replace Y with the desired drive letter) and press Enter. Your USB drive should now have the new drive letter assigned to it.
Changing the USB Connection
To change the USB connection, first, try using a different USB port on your computer and see if the error persists. If it does, try using a different USB cable or adapter to connect the USB drive. If the error still occurs, try connecting the USB drive to a different computer to determine if the issue is with the drive itself or the computer. If the problem persists, it may be a device driver issue, so update the device driver for the USB drive in the Device Manager.
Scanning for Hardware Changes
To fix the “Please Insert Disk into Removable Disk” error on your USB drive, you can start by scanning for hardware changes on your computer. To do this, go to Device Manager by right-clicking on the Windows Start button and selecting it from the menu. Once in Device Manager, click on Action in the top menu and then select Scan for hardware changes. This will prompt your computer to detect any changes in the hardware configuration, which may resolve the issue with your USB drive.
If this doesn’t work, you can also try using the diskpart command-line tool in Windows to troubleshoot and fix the error.
Updating USB Drive Drivers

To update USB drive drivers, first, plug in the USB drive. Go to Device Manager by right-clicking on the Windows logo and selecting it. Look for the USB drive under “Disk drives” or “Universal Serial Bus controllers”. Right-click on the USB drive and select “Update driver”.
Choose “Search automatically for updated driver software”. If this doesn’t work, go to the manufacturer’s website and download the latest driver for your specific USB drive model. Install the driver and restart your computer. This should resolve the “Please insert disk into removable disk” error.
Repairing the Drive by Formatting
To repair the drive by formatting, start by inserting the USB drive into your computer. Once connected, open File Explorer and right-click on the USB drive. From the context menu, select “Format”. Choose the desired file system and allocation unit size, then click “Start” to begin the formatting process. After completion, your USB drive should be repaired and ready for use.
Using Diskpart to Repair Inaccessible USB Drive

To use Diskpart to repair an inaccessible USB drive, first, insert the USB drive into your computer. Then, open a command prompt by typing “cmd” in the Windows search bar and selecting “Run as administrator. ” Next, type “diskpart” and press Enter to open the Diskpart tool. Type “list disk” to display all the available disks on your computer. Identify your USB drive by its size and type “select disk [number]” to choose it.
Then, type “attributes disk clear readonly” to clear any read-only attributes that may be causing the error. Finally, type “clean” to remove all partitions from the USB drive and then create a new partition by typing “create partition primary. ” This should repair the inaccessible USB drive and resolve the error message.
Deleting and Creating a New Partition
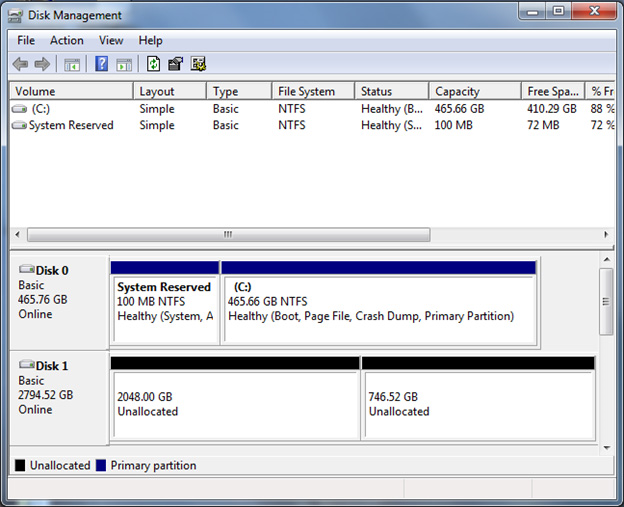
To delete and create a new partition, open Disk Management by right-clicking on the Start menu and selecting “Disk Management. “ Find your USB drive in the list of disks. Right-click on the volume and select “Delete Volume. “ Then, right-click on the unallocated space and choose “New Simple Volume.
“ Follow the wizard to create a new partition. If this doesn’t work, there may be a physical issue with the USB drive. Consider using a different drive or seeking professional help.
Data Recovery from USB Drive
If you are getting the error message “Please Insert Disk into Removable Disk” when trying to access your USB drive, it is possible that your data is still recoverable. One quick way to fix this error and recover your data is by using data recovery software. There are many reliable options available for both Windows and Mac computers. First, download and install a reputable data recovery software onto your computer. Then, connect your USB drive to your computer and run the software. Follow the on-screen instructions to scan and recover your lost files.
If this method does not work, you may need to seek professional help or consider other data recovery options such as using a different computer or trying a different USB port.
Preventing Future Errors with USB Drives
| Method | Description |
|---|---|
| 1. Safely eject the USB drive | Always use the “Safely Remove Hardware” option before unplugging the USB drive to prevent data corruption. |
| 2. Avoid forceful removal | Avoid pulling out the USB drive forcefully as it can damage the drive and cause errors. |
| 3. Keep the USB drive clean | Keep the USB drive clean and free from dust and debris to prevent connection errors. |
| 4. Use reliable USB ports | Avoid using damaged or loose USB ports to prevent connection issues with the USB drive. |
| 5. Scan for viruses | Regularly scan the USB drive for viruses and malware to prevent data corruption and errors. |
| 6. Update device drivers | Ensure that your device drivers are up to date to avoid compatibility issues with the USB drive. |
| 7. Use high-quality USB drives | Invest in high-quality USB drives to reduce the risk of errors and data loss. |
| 8. Store the USB drive properly | Store the USB drive in a safe and dry place to prevent physical damage and errors. |
| 9. Avoid overloading the USB drive | Avoid overloading the USB drive with large files to prevent data corruption and errors. |
| 10. Regularly back up data | Regularly back up the data on the USB drive to prevent loss in case of errors or damage. |