Introducing our comprehensive troubleshooting guide, your ultimate companion in resolving the notorious Outlook Error 550. Find expert solutions and practical tips to conquer this frustrating obstacle and restore smooth communication in no time.
Understanding Outlook Error 550
Outlook Error 550 is a common email error that occurs when the recipient’s server rejects your email. This error message can be frustrating, but there are a few tips you can try to fix it.
First, double-check the email address you are sending to and make sure it is correct.
Next, check your email content for any typos or phrases that could trigger spam filters.
If you are sending a large file, consider compressing it or using a file-sharing service instead.
If the error persists, it could be a server issue. Check with your email hosting provider or system administrator for assistance.
Common Phrases Denoting Email Error 550
1. “Mailbox unavailable” – This error message indicates that the recipient’s email address is invalid or the mailbox is no longer active.
2. “Relay not permitted” – This error occurs when the email server refuses to forward the message to the intended recipient’s server.
3. “Invalid helo name” – This error suggests that the email client’s domain name is incorrect or not recognized.
4. “Undeliverable” – This phrase indicates that the email could not be delivered to the recipient’s inbox.
5. “Mail recipient refused our IP address” – This error code suggests that the recipient’s email server has blocked or blacklisted your IP address.
To troubleshoot these errors, ensure that the recipient’s email address is correct, check your domain name settings, verify that your IP address is not blacklisted, and contact your email service provider for further assistance.
Fixing Outlook Error 550
When encountering Outlook Error 550, it typically indicates that the email you are trying to send has been rejected by the recipient’s email server. This error is commonly caused by issues with the recipient’s email address, server configuration, or spam filters. To troubleshoot this error, follow these steps:
1. Verify the recipient’s email address to ensure it is correct and active.
2. Check your email client’s settings to ensure they are properly configured for sending emails.
3. Review your email content for any potential issues, such as large file attachments or suspicious content that may trigger spam filters.
4. Consider reaching out to the recipient via an alternative communication source to confirm if they are experiencing any email issues.
5. If the error persists, contact your email hosting server or system administrator for further assistance.
Repairing Outlook Data Files
To fix Outlook Error 550, follow these troubleshooting steps:
1. Close Outlook and go to the Control Panel.
2. Search for “Mail” and open the “Mail (Microsoft Outlook)” options.
3. Click on “Data Files” and select the Outlook data file that is causing the error.
4. Click on “Open Folder Location” to locate the data file on your computer.
5. Make a backup of the data file by copying it to a safe location.
6. Open Outlook and go to the “File” tab.
7. Click on “Account Settings” and select “Account Settings” from the drop-down menu.
8. Go to the “Data Files” tab and click on “Add” to add a new data file.
9. Browse to the location of the backup file and select it.
10. Set the new data file as the default and close the Account Settings window.
Note: If the error persists, consider repairing the Outlook installation using the Microsoft Office Repair Tool.
Checking for Email Address Typos
To ensure that your emails are being delivered successfully, it’s important to double-check for email address typos. Even a small mistake can result in undeliverable messages and potential email marketing failure.
When encountering an Outlook error 550, it’s crucial to verify the recipient’s email address. Check for any typos, missing characters, or invalid domains. Be sure to use the correct format: [email protected].
Additionally, pay attention to any error codes or messages received. If you notice an SMTP 550 error, it indicates a failure in the Simple Mail Transfer Protocol communication source.
To prevent this issue, validate the email address before sending. You can use online tools or consult a resolver adr to confirm the address’s validity. Taking these proactive steps will help improve your email deliverability and avoid connection errors.
Sending the Email Later
To send an email later in Outlook, follow these steps:
1. Compose your email as usual.
2. Instead of clicking “Send,” click on the “Options” tab in the toolbar.
3. In the “More Options” group, select “Delay Delivery.”
4. A dialog box will appear. Set the date and time you want the email to be sent.
5. Click “Close” to save the changes.
6. Finish composing your email and click “Send.”
By scheduling your emails, you can optimize your email marketing potential and ensure timely delivery. This feature is particularly useful when you want to send emails at specific times to different time zones or when you’re away from your computer. Keep in mind that the email will be stored in your Outbox until the scheduled time, so make sure your Outlook is open and connected to the internet.
For more troubleshooting guidance on Outlook errors, refer to the comprehensive guide in our blog.
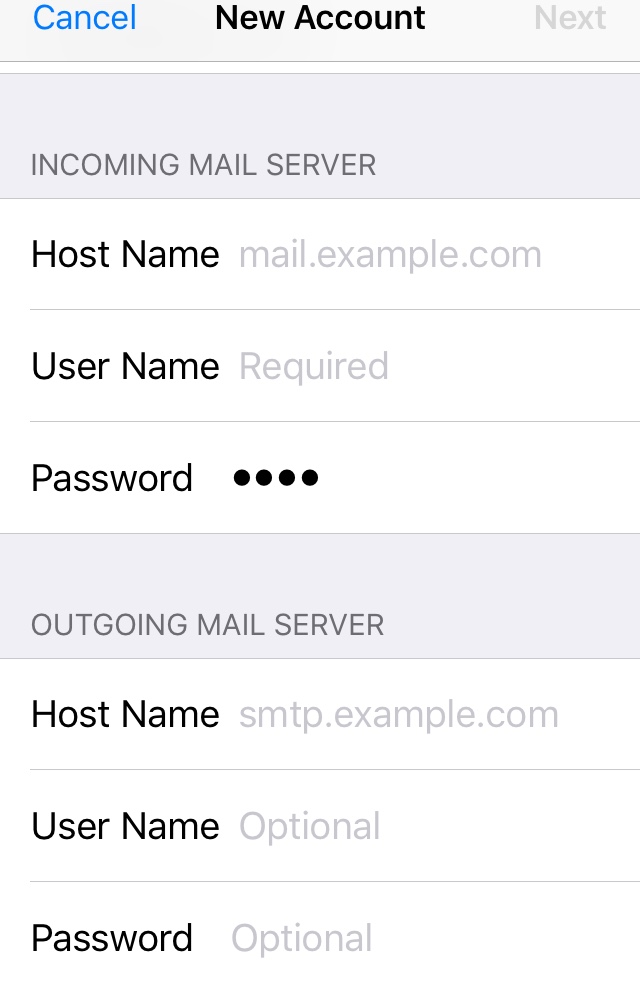
Changing the Outgoing Email Port
To change the outgoing email port in Outlook and fix error 550, follow these steps:
1. Open Outlook and go to File > Account Settings.
2. Select your email account and click on “Change”.
3. In the “Internet Email Settings” window, click on “More Settings”.
4. Go to the “Advanced” tab.
5. Under “Outgoing server (SMTP)”, change the port number to 587.
6. Enable the option “This server requires an encrypted connection (SSL/TLS)”.
7. Click “OK” to save the changes.
8. Close the “Internet Email Settings” window and click “Next” in the account settings.
9. Click “Finish” to complete the setup.
By changing the outgoing email port to 587 and enabling encryption, you can resolve the Outlook error 550 and ensure secure email communication.
Checking for IP Blacklisting
- Check if your IP address is blacklisted by following these steps:
- Open a web browser and go to a reputable IP blacklist checking website.

- Enter your IP address in the provided field.
- Click on the “Check” or “Submit” button to initiate the blacklist checking process.
- Wait for the results to display whether your IP address is blacklisted or not.
- If your IP address is blacklisted, proceed with the following steps:
- Contact your Internet Service Provider (ISP) to inform them about the blacklisting issue.
- Provide your ISP with the details of the blacklist(s) where your IP address is listed.
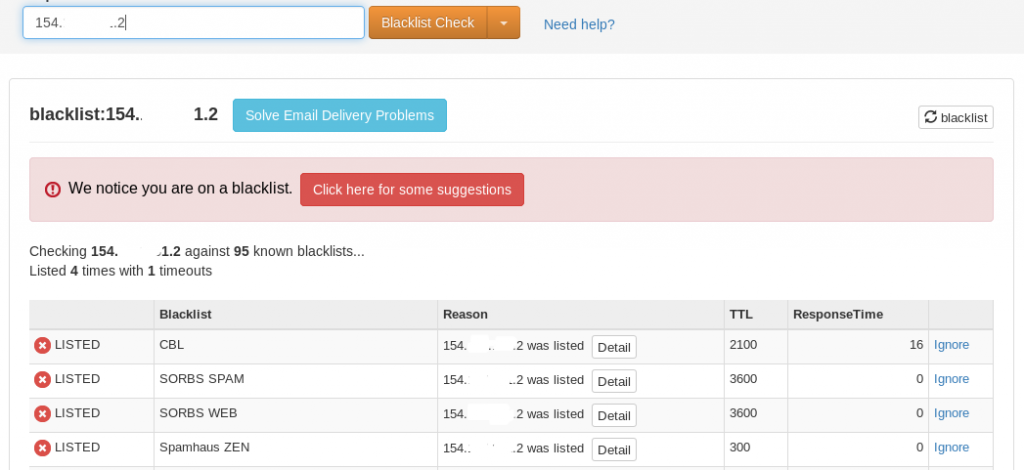
- Follow any instructions or recommendations provided by your ISP to resolve the blacklisting issue.
- Request your ISP to request a delisting of your IP address from the blacklists.
- Wait for the delisting process to complete, which may take some time.
- If your IP address is not blacklisted, consider other potential causes for the Outlook Error 550, such as:
- Incorrect email server settings.
- Issues with the recipient’s email server.
- Problems with your email client or Outlook configuration.
- Network connectivity or firewall issues.
- Refer to the comprehensive troubleshooting guide for further steps to resolve the Outlook Error 550 in these cases.
Enabling SMTP Authentication and Contacting ISP
To enable SMTP authentication and contact your ISP to fix Outlook Error 550, follow these steps:
1. Enable SMTP authentication: In Outlook, go to “File” > “Account Settings” > “Account Settings.” Select your email account and click “Change.” Under “More Settings,” go to the “Outgoing Server” tab and check the box that says “My outgoing server (SMTP) requires authentication.”
2. Contact your ISP: If you’re still experiencing the error, it’s best to reach out to your Internet Service Provider (ISP). They can help troubleshoot any issues with your email settings or server configurations.
3. Provide relevant information: When contacting your ISP, be sure to mention the error code or number you’re receiving (SMTP 550, error number 550 5.7 1, etc.). Explain the steps you’ve already taken to resolve the issue and any specific error messages you’ve encountered.
4. Follow ISP instructions: Your ISP may provide specific instructions or settings to resolve the error. They may also suggest additional troubleshooting steps based on their knowledge of your email server and hosting environment.