Are you experiencing issues with your network driver in Windows? It can be frustrating, but there are several steps you can take to fix the problem. Let’s explore some solutions to get your network driver working properly again.
Initial Troubleshooting Steps
– First, check if the network driver is enabled. Right-click on the Windows Start menu and select Device Manager. Look for the network adapter in the list and ensure it is enabled.
– If the driver is enabled, try updating it. Right-click on the network adapter in Device Manager and select Update driver. Follow the on-screen instructions to complete the update.
– If updating the driver doesn’t work, try uninstalling it. Right-click on the network adapter in Device Manager and select Uninstall device. Then restart your computer and let Windows reinstall the driver automatically.
– Check for any hardware issues by ensuring the network adapter is properly connected to the motherboard or expansion card. If using a wireless adapter, make sure it is securely inserted into a USB port.
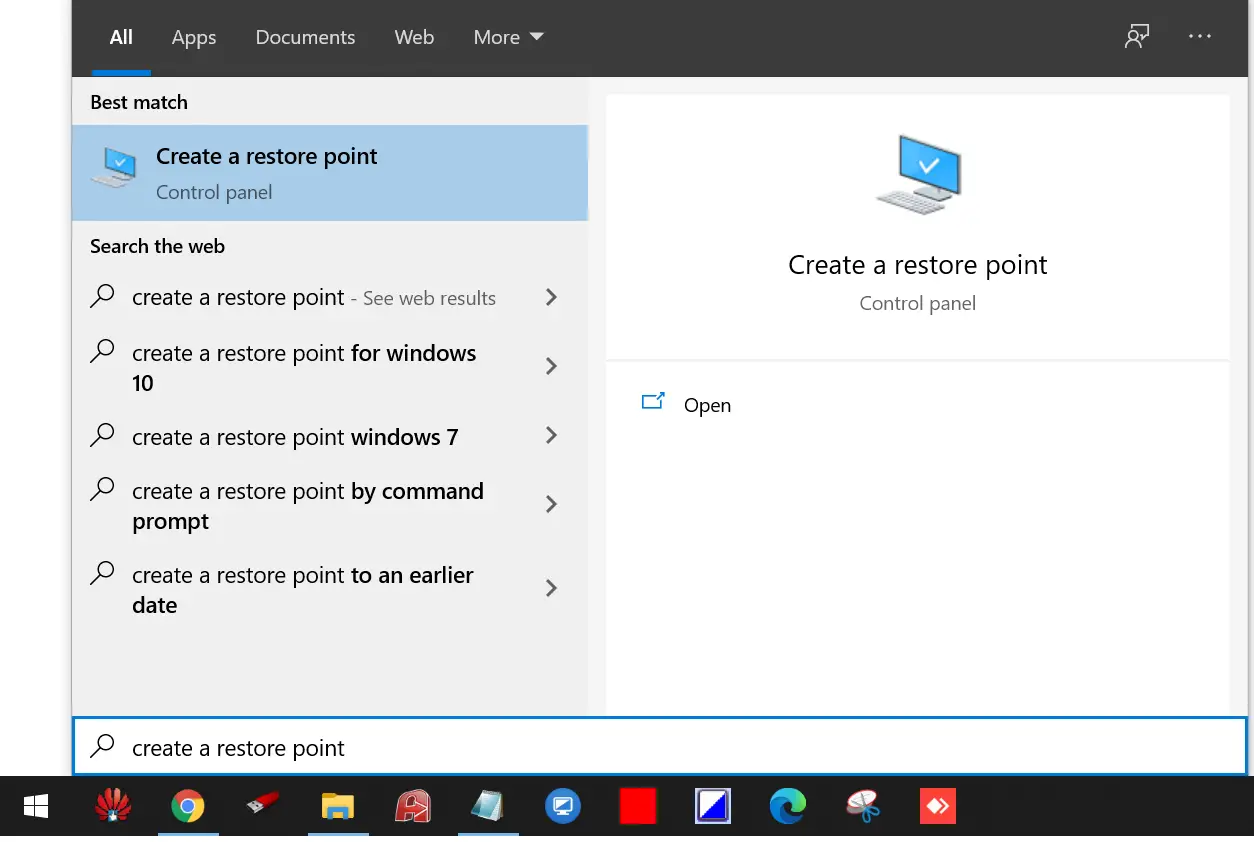
– Consider using System Restore to roll back your system to a point where the network driver was working properly. This can be accessed through the Control Panel or by searching for “System Restore” in the Windows search bar.
– If none of these steps work, it may be worth considering using a live CD or USB with a different operating system to determine if the issue is related to your current Windows installation.
–
Verify Adapter Status
To verify the adapter status in Windows, you can follow these steps:
Step 1: Go to the Start menu and type “Device Manager” in the search bar.
Step 2: Click on the Device Manager from the search results to open it.
Step 3: Look for the “Network adapters” option in the Device Manager window and click on it to expand the list.
Step 4: Check for the network adapter that you are having trouble with. It should be listed here with its current status.
If the network adapter is listed with an error symbol or if its status is showing as “disabled,” you may need to troubleshoot or update the device driver.
Device Manager Diagnostics
To diagnose network driver issues using Device Manager in Windows, follow these steps:
1. Open Device Manager
– Press the Windows key + X, then select Device Manager from the menu.
2. Check for network adapter issues
– Look for any warning symbols next to your network adapter. If you see one, right-click on the adapter and select “Update driver” to see if that resolves the issue.
3. Reinstall the network driver
– If updating the driver doesn’t work, right-click on the network adapter again and select “Uninstall device.” Then restart your computer to allow Windows to reinstall the driver automatically.
These steps should help you diagnose and fix network driver issues using Device Manager in Windows. If the problem persists, you may need to seek further assistance or consider other troubleshooting methods.
Inspect Physical Connections
| Step | Description |
|---|---|
| 1 | Check if the Ethernet cable is securely plugged into both the computer and the router or modem. Ensure there are no visible signs of damage to the cable. |
| 2 | If using a wireless connection, verify that the Wi-Fi adapter is properly installed and turned on. Check for any physical obstructions that may interfere with the wireless signal. |
| 3 | Inspect the network port on the computer for any damage or debris that may be affecting the connection. Clean the port if necessary. |
| 4 | Restart the router or modem to ensure there are no issues with the network hardware. |
| 5 | If possible, test the network connection with another device to determine if the issue is isolated to the computer. |
Install or Update Drivers
You will then have the option to either search for updated driver software automatically, or to browse your computer for driver software. If you choose to search automatically, Windows will search for the latest driver software for your network adapter and install it if it finds an update.
If you choose to browse your computer for driver software, you will need to have already downloaded the updated driver software to your computer. You can then navigate to the location where the driver software is saved and follow the on-screen instructions to install it.
Once the driver software has been updated, restart your computer to complete the installation process. This should resolve any issues with your network driver not working in Windows.
Utilize Built-in Network Troubleshooter
To fix network driver issues in Windows, you can utilize the built-in network troubleshooter. This tool can help diagnose and resolve common network problems on your computer.
First, open the Network Troubleshooter by right-clicking on the network icon in the taskbar and selecting “Troubleshoot problems.” This will launch the troubleshooter and begin scanning for any issues with your network driver.
Follow the on-screen prompts to allow the troubleshooter to diagnose and attempt to fix any network driver problems. The troubleshooter will provide you with suggestions and potential fixes for the issue it identifies.
If the troubleshooter is able to resolve the problem, it will notify you once the fix is applied. If the issue persists, the troubleshooter may provide additional recommendations for further troubleshooting or resolution steps.
Using the built-in network troubleshooter in Windows can be a quick and easy way to address network driver issues without having to manually dive into device settings or configurations.
System Restoration Techniques
If your network driver is not working in Windows, there are a few system restoration techniques you can try to fix the issue.
First, try using the built-in Windows troubleshooting tool to diagnose and fix any problems with your network driver. You can access this tool by right-clicking on the network icon in the taskbar and selecting “Troubleshoot problems.”
If that doesn’t work, you can try rolling back the network driver to a previous version. To do this, go to Device Manager, find your network adapter, right-click on it, and select “Properties.” Then, go to the “Driver” tab and select “Roll Back Driver” if the option is available.
If rolling back the driver doesn’t solve the problem, you can also try updating the driver to the latest version. You can do this by going to Device Manager, finding your network adapter, right-clicking on it, and selecting “Update driver.” Then, choose to search automatically for updated driver software.
If none of these techniques work, you can also try using System Restore to revert your computer to a previous state where the network driver was working properly. To do this, type “System Restore” in the Windows search bar and follow the prompts to restore your system to an earlier point in time.
By using these system restoration techniques, you may be able to fix the issue with your network driver not working in Windows.
Adapter Configuration Adjustments
1. Check Adapter Settings: Go to the Control Panel and navigate to Network and Sharing Center. Click on Change adapter settings and then right-click on the network adapter that is not working.
2. Update or Rollback Driver: In the context menu, select Properties and then go to the Driver tab. If the driver is outdated, click on Update Driver and follow the prompts. If the driver was recently updated and started causing issues, select Roll Back Driver.
3. Disable and Enable Adapter: If updating or rolling back the driver does not work, try disabling and then enabling the adapter. Right-click on the adapter and select Disable, then right-click again and select Enable.
4. Check for Hardware Issues: If the adapter is still not working, it may be a hardware issue. Check the device manager for any error messages or try using the adapter in another computer to see if it works there.
5. Restart the Computer: Sometimes a simple restart can resolve issues with network adapters. Save any open work and restart the computer to see if the adapter starts working again.
Inspect BIOS and Power Settings
- Access the BIOS by restarting the computer and pressing the appropriate key (often Del or F2) to enter the BIOS setup.
- Once in the BIOS, navigate to the Power Settings or Advanced Settings section.
- Ensure that the network adapter is enabled and set to the correct power management mode (e.g. Maximum Performance).
- Save any changes made in the BIOS and exit the setup.
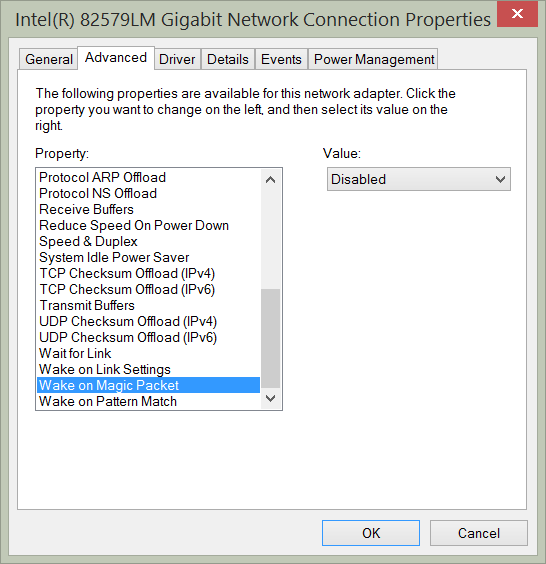
- Restart the computer and test the network connection.