Unlocking the Potential: Discover Effective Solutions for Unresponsive Computer Keyboard Keys
Key malfunction issues
First, check for any physical issues. Ensure there is no debris or dirt obstructing the keys, and that the keycap is properly attached. If necessary, clean the keyboard using compressed air or a soft cloth.
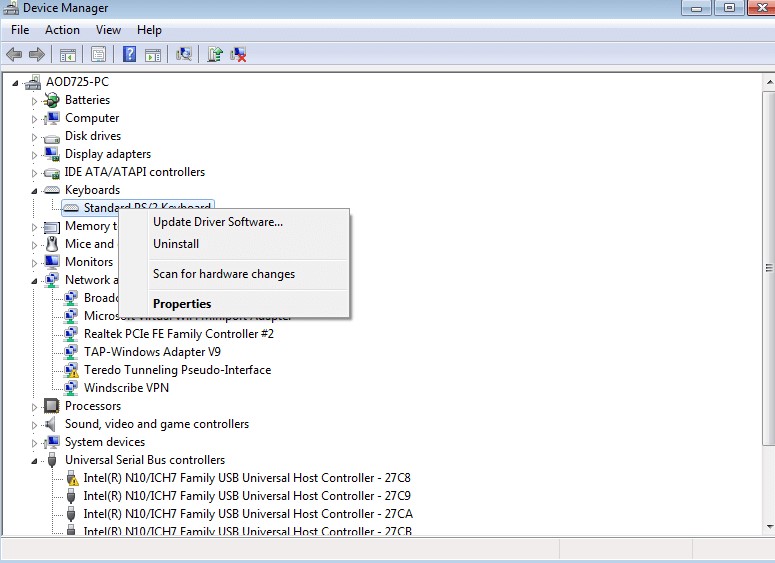
If the issue persists, it could be a driver problem. Update your keyboard driver through the Device Manager in Windows. Right-click on the Start button, select Device Manager, and expand the Keyboards section. Right-click on your keyboard and select Update driver.
Another possibility is a hardware problem. Try connecting your keyboard to a different USB port or a different computer to see if the issue persists. If it does, the keyboard may need to be repaired or replaced.
In some cases, the function lock may be enabled, causing certain keys to not work as expected. Press the function lock key (usually labeled “Fn”) to toggle it on or off.
Remember to check for any software modifications or settings that may be affecting your keyboard’s functionality. Additionally, ensure that your computer is up to date with the latest Windows updates.
By following these steps, you should be able to diagnose and fix most non-responsive keyboard key issues.
Non-functional keys on the keyboard
If you’re experiencing non-functional keys on your computer keyboard, there are a few steps you can take to fix the issue. First, check if the key is physically stuck or damaged. If so, you may need to replace the keycap or the entire keyboard.
If the key appears to be fine, try cleaning it with compressed air to remove any debris that may be causing the problem.
Next, check for any loose or disconnected cables. Ensure that the keyboard is properly connected to your PC.
If the non-functional key is a function key, you can try using an online tool or software to remap it to a different function.
In some cases, the issue may be due to a driver problem. Update your keyboard driver by going to the manufacturer’s website and downloading the latest driver for your specific keyboard model.
If none of these steps resolve the issue, it’s possible that there may be a hardware failure or a more complex underlying problem. In such cases, it may be best to seek professional assistance or consider replacing the keyboard altogether.
Key interference in specific programs
Key interference can often be the culprit behind non-responsive computer keyboard keys. If you’re experiencing this issue, there are a few steps you can take to fix it.
First, try cleaning the affected keys. Use a can of compressed air to remove any debris that may be causing interference. If that doesn’t work, you can try gently removing the keycap and cleaning the area underneath with a soft brush or cloth.
Another potential solution is to check for any software conflicts. Sometimes, certain programs can cause key interference. To troubleshoot this, try closing any unnecessary programs or running a scan for malware or viruses.
If the issue persists, you can try resetting your keyboard settings. On Windows, you can do this by going to the Control Panel, selecting “Keyboard,” and clicking on the “Hardware” tab. From there, click on “Properties” and then “Driver.” Finally, click on “Uninstall” and restart your computer.
Hopefully, these steps will help resolve the key interference issue and get your keyboard back to working properly.
Keyboard troubleshooting steps
- Check physical connections:
- Ensure the keyboard is properly plugged into the computer.
- If using a wired keyboard, check the USB or PS/2 connection.

- If using a wireless keyboard, ensure the batteries are inserted correctly and have sufficient charge.
- Try connecting the keyboard to a different USB port or using a different USB cable.
- Restart the computer:
- Save any open files and restart the computer.
- Allow the operating system to fully boot up before testing the keyboard.

- Clean the keyboard:
- Turn off the computer and disconnect the keyboard.
- Use compressed air or a soft brush to remove any debris or dust from the keys.

- Gently wipe the keys with a damp cloth or keyboard cleaning solution.
- Allow the keyboard to dry completely before reconnecting it.
- Update keyboard driver:
- Open the Device Manager by pressing Win+X and selecting “Device Manager”.
- Expand the “Keyboards” category and right-click on the keyboard device.

- Select “Update driver” and choose the option to automatically search for updated driver software.
- Follow the on-screen instructions to complete the driver update process.
- Uninstall and reinstall keyboard driver:
- Open the Device Manager by pressing Win+X and selecting “Device Manager”.
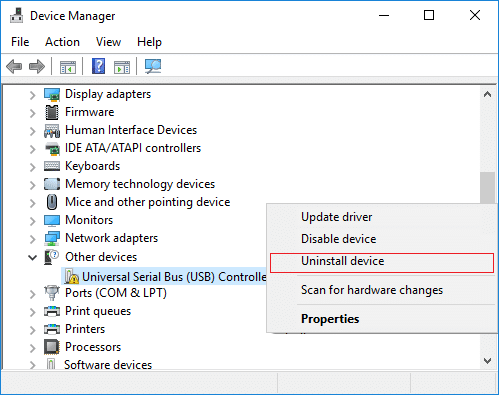
- Expand the “Keyboards” category and right-click on the keyboard device.

- Select “Uninstall device” and confirm the uninstallation.
- Restart the computer.
- Windows will automatically reinstall the keyboard driver upon startup.
- Try the keyboard on another computer:
- Disconnect the keyboard from the current computer.
- Connect the keyboard to another computer and test if the keys are responsive.

- If the keyboard works on the other computer, the issue may be with the original computer.
- Replace the keyboard:
- If all troubleshooting steps fail, consider replacing the keyboard with a new one.
- Ensure compatibility with the computer’s operating system and connection type.

Resolving the “@” symbol not working
If the “@” symbol is not working on your computer keyboard, there are a few potential solutions to try. First, make sure your keyboard is connected properly to your PC. Check the cable for any damage and ensure it is securely plugged in.
If the rest of the keys on your keyboard are working fine, it may be a specific issue with the “@” key. In this case, you can try a few troubleshooting steps.
1. Clean the keyboard: Use compressed air or a cleaning tool to remove any debris or dust that may be affecting the key’s functionality.
2. Check for stuck keys: Sometimes, nearby keys can become stuck, causing issues with other keys. Gently press and release the surrounding keys to ensure they are not stuck.
3. Update keyboard drivers: Go to the manufacturer’s website and download the latest drivers for your keyboard. Install them and restart your computer.
If none of these solutions work, it may be necessary to replace the keyboard. Consider reaching out to a professional for further assistance.
Language settings and keyboard functionality
Language Settings and Keyboard Functionality
If you’re experiencing issues with non-responsive keyboard keys on your computer, there are a few steps you can take to fix the problem. First, check your language settings and make sure they are configured correctly. Sometimes, incorrect language settings can cause certain keys to not function properly. To do this, go to the Control Panel and select “Language” or “Region and Language.” Make sure the correct language is selected and set as the default.
If the issue persists, you can try resetting your keyboard functionality. To do this, press the Windows key + Spacebar to switch between different keyboard layouts. This can help resolve any software-related problems.
If a specific key is not working, you can try cleaning it. Use compressed air or a cotton swab dipped in isopropyl alcohol to remove any debris or dirt that may be causing the problem.
If none of these steps work, it’s possible that there may be a hardware issue with your keyboard. In this case, it may be necessary to replace the keyboard or contact technical support for further assistance. Remember to always refer to the manufacturer’s instructions for any modifications or repairs to your keyboard.
By following these steps, you can troubleshoot and fix non-responsive keys on your computer keyboard.
Updating chipset and keyboard drivers
To fix non-responsive computer keyboard keys, you may need to update your chipset and keyboard drivers. Here’s how:
1. Start by identifying the specific keys that aren’t working. Is it the @ key, the shift key, the enter key, or others? This will help you troubleshoot more effectively.
2. Visit the manufacturer’s website and search for the latest drivers for your chipset and keyboard. Download and save them to your computer.
3. Open Device Manager by pressing the Windows key + X and selecting “Device Manager” from the menu. Expand the “Keyboards” section.
4. Right-click on your keyboard and select “Update driver.” Choose the option to browse your computer for drivers.
5. Locate the downloaded chipset and keyboard driver files and select them for installation.
6. Follow the on-screen instructions to complete the driver update process.
7. After the update is finished, restart your computer for the changes to take effect.
By updating your chipset and keyboard drivers, you can resolve issues with non-responsive keys and ensure optimal performance.
Fixing unresponsive or dead keys on a mechanical keyboard
Fixing Non-Responsive Computer Keyboard Keys
| Issue | Possible Cause | Solution |
|---|---|---|
| Unresponsive Key | Dust or debris under the key switch | 1. Turn off the computer and unplug the keyboard 2. Use compressed air or a small brush to clean under the key 3. Press the key firmly to ensure it is properly seated |
| Dead Key | Failed key switch or connection | 1. Test the key on a different computer to confirm it’s not a software issue 2. If the key still doesn’t work, replace the key switch or the entire keyboard |
| Multiple Unresponsive Keys | Driver or software conflict | 1. Update or reinstall keyboard drivers 2. Check for conflicting software or keybinds 3. If the issue persists, consult technical support or consider a keyboard replacement |
| Spilled Liquid on Keys | Liquid damage to key switches or PCB | 1. Immediately disconnect the keyboard and turn it upside down to drain excess liquid 2. Allow the keyboard to dry completely before attempting to use it again 3. If the issue persists, consult technical support or consider a keyboard replacement |
