Struggling with 100% disk usage on Windows 10? Here are 8 tips to help solve the issue.
Restart Your System
If you’re experiencing 100% disk usage on Windows 10, a simple restart of your system can often help to clear up any temporary issues that may be causing the problem. To do this, click on the Windows Start menu, select the Power button, and choose Restart from the options. Once your computer has restarted, check to see if the disk usage has returned to normal.
If a restart doesn’t solve the issue, there may be other underlying problems causing the high disk usage. In this case, it’s important to explore other troubleshooting options to address the issue.
Update Windows and Drivers
To address the issue of 100% disk usage on Windows 10, one important step is to update Windows and drivers. Outdated Windows and drivers can cause performance issues and lead to high disk usage.
First, ensure that your Windows operating system is up to date by going to Windows Update in the settings. Check for any available updates and install them. This will ensure that your system has the latest patches and bug fixes, which can help improve disk usage.
Next, it’s important to update your device drivers. Drivers are essential for the proper functioning of hardware components in your computer. Outdated or faulty drivers can cause high disk usage. You can update drivers manually by going to the device manager, locating the specific hardware component, and selecting “Update driver.” Alternatively, you can use third-party driver update software to automatically scan and update your drivers.
By keeping your Windows operating system and device drivers up to date, you can potentially resolve the issue of 100% disk usage on Windows 10. This simple step can improve system performance and ensure that your hardware components are functioning optimally.
Check for Malware and Viruses
Run a full system scan with your antivirus software to check for any malware or viruses.
In addition to using antivirus software, it’s also important to keep your operating system and other software up to date with the latest patches and updates. This can help protect your system from known vulnerabilities that could be exploited by malware or viruses.
Regularly update your Windows 10 operating system and other software to ensure you have the latest security patches and updates.
If you suspect that malware or viruses may be the cause of the 100% disk usage issue, it’s also a good idea to check for any suspicious processes running on your system. Use the Task Manager to view a list of running processes and identify any that seem out of the ordinary or are consuming a large amount of system resources.
Use the Task Manager to identify any suspicious processes that may be causing the 100% disk usage issue.
By taking these steps to check for malware and viruses, you can help ensure that your system is secure and free from any malicious programs that could be causing performance issues.
Disable Windows Search and Superfetch
1. Press the Windows key + R to open the Run dialog box.
2. Type “services.msc” and press Enter to open the Services window.
3. Scroll down and locate “Windows Search” and “Superfetch” in the list of services.
4. Double-click on each service to open its properties.
5. In the properties window, change the “Startup type” to “Disabled.”
6. Click “Apply” and then “OK” to save the changes.
7. Restart your computer for the changes to take effect.
Disabling Windows Search and Superfetch can help reduce disk usage on Windows 10, especially if these services are causing high disk activity.
Modify Energy Options
To modify energy options on Windows 10, begin by clicking on the Windows key and typing “Control Panel” in the search bar. Then, click on “Control Panel” in the search results. Next, click on “Hardware and Sound,” then “Power Options.” Once there, click on “Change plan settings” next to the power plan you are currently using.
Adjust Settings
After clicking on “Change plan settings,” you can adjust the settings for when the computer goes to sleep and when the display turns off. You can also adjust the advanced power settings by clicking on “Change advanced power settings” in the Power Options window. Here, you can modify options such as processor power management and system cooling policy.
Disable Background Apps
Another tip to solve 100% disk usage on Windows 10 is to disable background apps. To do this, go to “Settings,” then “Privacy,” and click on “Background apps.” Here, you can toggle off the apps that you do not want running in the background.
Check for Updates
Make sure to check for updates for both Windows and device drivers. To do this, click on the Windows key, then go to “Settings” and click on “Update & Security.” Here, you can check for updates for Windows as well as for device drivers.
Temporarily Disable Antivirus Software
To temporarily disable your antivirus software, you can follow these steps. First, locate the antivirus software icon in your system tray or on your desktop. Right-click on the icon to open the menu. Look for an option that allows you to temporarily disable the antivirus software. This option may be labeled as “disable protection” or something similar.
If you can’t find the option to disable the antivirus software from the system tray or desktop icon, you can also open the antivirus software directly. Look for the settings or preferences menu within the antivirus software. From there, you should be able to find an option to temporarily disable the software.
Once you’ve found the option to disable the antivirus software, click on it to turn off the protection. Keep in mind that this is only a temporary measure to troubleshoot the 100% disk usage issue on your Windows 10 computer. It’s important to re-enable the antivirus software once you’ve resolved the problem to ensure the ongoing security of your system.
Remember that while your antivirus software is disabled, your computer may be vulnerable to malware and other security threats. Avoid downloading or opening any suspicious files or visiting potentially unsafe websites while your antivirus software is disabled. Additionally, it’s a good idea to re-enable the antivirus software as soon as possible to minimize the risk of infection.
By temporarily disabling your antivirus software, you can troubleshoot the 100% disk usage issue on your Windows 10 computer. Just be sure to re-enable the software once you’ve resolved the problem to ensure the ongoing security of your system.
Reset Virtual Memory
To reset the virtual memory on Windows 10, follow these steps:
1. First, right-click on the “Start” button and select “System.”
2. In the System window, click on “Advanced system settings” on the left-hand side.
3. Under the “Advanced” tab, click on the “Settings” button in the “Performance” section.
4. In the Performance Options window, go to the “Advanced” tab and click on the “Change” button in the “Virtual memory” section.
5. Uncheck the box that says “Automatically manage paging file size for all drives.”
6. Select the drive you want to change the virtual memory for, and then click on “Custom size.”
7. Enter the initial size and maximum size for the virtual memory, then click “Set” and “OK” to save the changes.
8. Finally, restart your computer for the changes to take effect.
By following these steps, you can reset the virtual memory on Windows 10 and potentially solve the issue of 100% disk usage.
Remember to always be cautious when making changes to your system settings, and if you’re unsure about anything, it’s best to seek technical support or guidance from trusted sources.
Following these steps can help you troubleshoot and resolve performance issues related to virtual memory and disk usage on your Windows 10 system.
Perform a Disk Check
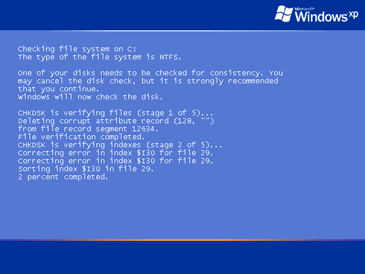
If you are experiencing 100% disk usage on Windows 10, performing a disk check can help identify and fix any issues with your hard drive. To do this, you can use the built-in Windows utility called Check Disk (CHKDSK).
First, open a Command Prompt with administrative privileges by searching for “cmd” in the Windows search bar, right-clicking on Command Prompt, and selecting “Run as administrator.”
Next, type the following command and press Enter: chkdsk /f /r. This will initiate a disk check and attempt to fix any errors it finds. You may be prompted to schedule the disk check for the next time your computer restarts.
After scheduling the disk check, restart your computer to allow the process to run. This may take some time, so be patient and let it complete.
Once the disk check is finished, Windows will load as usual, and you can check if the disk usage issue has been resolved.
Performing a disk check can help identify and fix any underlying issues with your hard drive that may be causing the 100% disk usage problem. This simple troubleshooting step can often make a big difference in improving the performance of your Windows 10 system.
Adjust Settings in Browsers and Apps
- Clear browsing data and cookies in web browsers such as Google Chrome or Firefox.
- Disable unnecessary browser extensions and add-ons that may be consuming disk resources.
- Check for updates and install the latest version of web browsers and apps to ensure they are running efficiently.
Address StorAHCI.sys Driver Issues
If you are experiencing 100% disk usage on Windows 10 due to StorAHCI.sys driver issues, here are 8 tips to help you solve the problem.
1. Update the StorAHCI.sys driver: Make sure you have the latest version of the StorAHCI.sys driver installed on your system. You can download and install the driver from the manufacturer’s website or use Windows Update to check for any available updates.
2. Check for hardware issues: Sometimes, disk usage issues can be caused by faulty hardware. Use the built-in Windows Memory Diagnostic tool to check for any memory-related problems and run a disk check to scan for any hard drive errors.
3. Disable Superfetch and Windows Search: Superfetch and Windows Search are two Windows services that can contribute to high disk usage. You can disable these services by accessing the Services application and stopping or disabling them.
4. Adjust your virtual memory settings: If your system is using too much virtual memory, it can lead to high disk usage. You can adjust your virtual memory settings by going to Control Panel > System > Advanced system settings > Performance Settings > Advanced > Change.
5. Disable Windows notifications: Windows notifications can also contribute to high disk usage. You can disable them by going to Settings > System > Notifications & actions and turning off the “Get tips, tricks, and suggestions as you use Windows” option.
6. Check for malware: Malware and viruses can also cause high disk usage. Use a reliable antivirus program to scan your system for any infections and remove any threats that are found.
7. Update your device drivers: Outdated or incompatible device drivers can also contribute to high disk usage. Make sure all your device drivers are up to date by using Windows Update or visiting the manufacturer’s website.
8. Consider a clean install of Windows: If all else fails, you may want to consider performing a clean install of Windows to start with a fresh, optimized system.
Remove Temporary Files
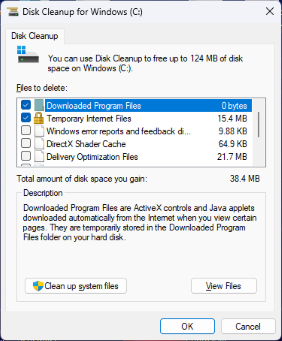
To solve 100% disk usage on Windows 10, one of the first things you can do is to remove temporary files from your system. These files can take up valuable space and contribute to the disk usage issue.
To remove temporary files, simply press the Windows key + R to open the Run dialog box. Type in “temp” and press Enter. This will open the Temp folder where you can delete all the files and folders.
Next, press the Windows key + R again and type in “%temp%” and press Enter. This will open another Temp folder where you can delete all the files and folders as well.
You can also use the built-in Disk Cleanup tool to remove temporary files. To do this, type “Disk Cleanup” in the Windows search bar and open the tool. Select the drive you want to clean up and the tool will calculate how much space you can free up. Check the boxes for the types of files you want to delete and click OK.
After removing temporary files, you should see an improvement in your disk usage. If the issue persists, you can move on to the next tip in the article.
Check for Corrupted System Files
Another way to check for corrupted system files is to use the Deployment Image Servicing and Management tool. Again, open Command Prompt as an administrator and type “DISM /Online /Cleanup-Image /RestoreHealth” and press Enter. This will scan and repair the Windows system image.
If you’re still experiencing 100% disk usage after checking for corrupted system files, you may want to consider other potential causes such as malware or a failing hard drive. It’s also a good idea to ensure your Windows operating system and device drivers are up to date.
