Unraveling the Mysteries: A Guide to Resolving Ethernet’s Self-Assigned IP
Understanding the “self-assigned IP address” error
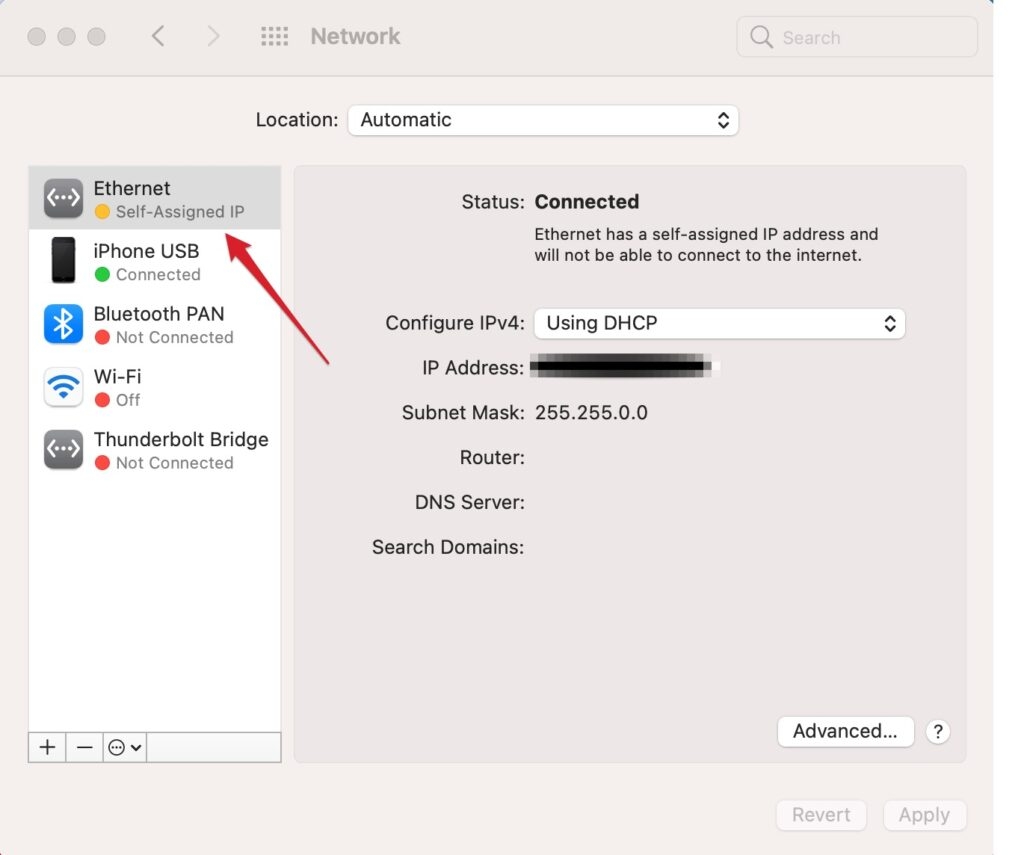
When your Ethernet connection displays a “self-assigned IP address” error, it means that your device was unable to obtain a valid IP address from the network. This can happen due to various reasons, such as network configuration conflicts or DHCP server issues. To fix this error, try the following steps:
1. Restart your device and modem/router.
2. Check your network settings and ensure that “Configure IPv4” is set to “Using DHCP.”
3. Reset your network configurations by deleting the existing network preferences file.
4. Update your device’s software to the latest version.
5. If the issue persists, contact your network administrator or Internet service provider for further assistance.
Resolving the “self-assigned IP address” error on Mac
- Verify network connections: Ensure that all cables are securely plugged in and that your Ethernet adapter is properly connected to the network.
- Restart your Mac: Sometimes a simple restart can resolve the self-assigned IP address issue.
- Reset network settings: Resetting the network settings on your Mac can help fix any configuration issues causing the error.
- Check DHCP settings: Make sure that the DHCP (Dynamic Host Configuration Protocol) settings on your router or network are correctly configured.
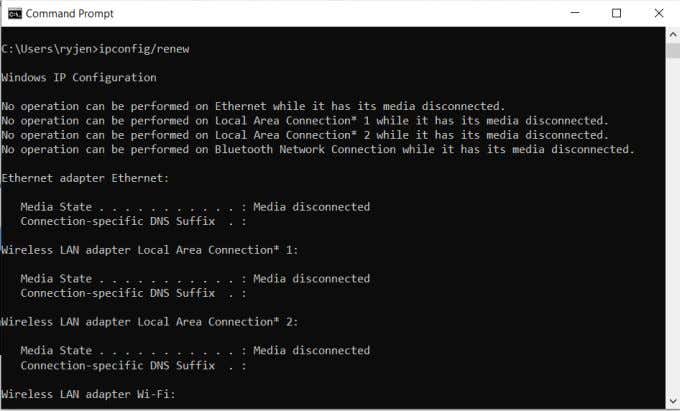
- Release and renew IP address: Use the Terminal utility to release and renew your IP address, which can help resolve conflicts and obtain a valid IP from the network.
- Disable and re-enable Ethernet: Temporarily disabling and re-enabling the Ethernet connection can refresh the network settings and potentially solve the self-assigned IP issue.
- Update macOS: Ensure that your Mac is running the latest version of macOS, as outdated software can sometimes contribute to network problems.
- Reset PRAM/NVRAM: Resetting the PRAM (Parameter RAM) or NVRAM (Non-Volatile Random-Access Memory) on your Mac can clear certain settings that may be causing the self-assigned IP address error.
- Run Network Diagnostics: Utilize the built-in Network Diagnostics tool on your Mac to identify and troubleshoot any network-related issues.
- Contact network administrator: If you’re unable to resolve the self-assigned IP address error on your own, reach out to your network administrator or Internet Service Provider (ISP) for further assistance.
Troubleshooting steps for the “self-assigned IP address” error
Troubleshooting Steps for “Self-Assigned IP Address” Error:
1. Restart your computer and modem/router.
2. Verify that your Ethernet cable is securely connected to both your computer and the modem/router.
3. Check if the Ethernet adapter is enabled in your network settings.
4. Reset your network settings by going to System Preferences > Network > Advanced > TCP/IP > “Renew DHCP Lease.”
5. If using a MacBook, try using a different Ethernet adapter or connect to Wi-Fi.
6. Disable any third-party firewall or security software temporarily.
7. Contact your internet service provider or network administrator to check for any DHCP server issues.
8. If all else fails, consult the documentation or support resources provided by your device manufacturer.
python

import subprocess
def get_self_assigned_ip(interface_name):
# Run command to retrieve IP address information for the specified interface
cmd = f"ipconfig getifaddr {interface_name}"
process = subprocess.Popen(cmd, shell=True, stdout=subprocess.PIPE, stderr=subprocess.PIPE)
output, error = process.communicate()
if process.returncode == 0:
ip_address = output.decode().strip()
return ip_address
else:
error_message = error.decode().strip()
return f"Error: {error_message}"
# Provide the name of the Ethernet interface, e.g., "en0" on macOS or "eth0" on Linux
interface_name = "en0"
# Call the function to obtain the self-assigned IP address
ip_address = get_self_assigned_ip(interface_name)
# Display the obtained IP address
print(f"Self-assigned IP address on {interface_name}: {ip_address}")
In the above code, we utilize the `subprocess` module to execute the `ipconfig` command (on macOS) or an equivalent command (on Linux) to retrieve the IP address associated with the specified Ethernet interface. The obtained IP address is then printed to the console.
Please note that this code assumes the usage of the `ipconfig` command on macOS. For Linux or Windows, you may need to modify the command accordingly, such as using `ifconfig` on Linux or `ipconfig` on Windows. Additionally, the code may require appropriate privileges to access network interface information.
Preventing future occurrences of the IP error
To prevent future occurrences of the IP error when fixing Ethernet’s self-assigned IP, follow these steps:
1. Check for network configuration conflicts. Ensure that there are no conflicts between your firewall configuration and other network settings.
2. Restart your router and modem. Sometimes, a simple restart can resolve connectivity issues and resolve IP conflicts.
3. Reset your network settings. Go to Network Preferences and delete any ad-hoc network configurations that may be causing conflicts.
4. Renew your IP address. Open Terminal and type “sudo ipconfig set en0 DHCP” to renew your IP address.
5. Update your network drivers. Visit the manufacturer’s website and download the latest drivers for your Ethernet adapter.
Bonus fixes for the “self-assigned IP address” error
Bonus Fixes for the “Self-Assigned IP Address” Error
| Fix | Description |
|---|---|
| Restart Router and Modem | Power off both your router and modem, wait for a few seconds, then power them back on. This can often resolve temporary network issues and assign a proper IP address. |
| Release and Renew IP | Open the Command Prompt (Windows) or Terminal (Mac), then type the command “ipconfig /release” followed by “ipconfig /renew” (on Windows) or “sudo ipconfig set en0 DHCP” (on Mac). This will release your current IP address and request a new one from the DHCP server. |
| Reset Network Settings | On your device, navigate to the network settings and find the option to reset network settings. This will erase any saved Wi-Fi networks and DHCP configurations, allowing you to start fresh with a new IP address. |
| Use a Static IP Address | Instead of relying on DHCP, manually assign a static IP address to your device. Ensure the IP address falls within your network’s IP range and doesn’t conflict with any other devices. |
| Update Network Driver | If you are experiencing the “self-assigned IP address” error on a computer, try updating the network driver. Visit the manufacturer’s website or use a driver update utility to download and install the latest driver for your network adapter. |