Struggling with a Windows 10 WiFi turn on issue that isn’t showing up? Let’s delve into some solutions.
Verify the Laptop’s WiFi Switch is On
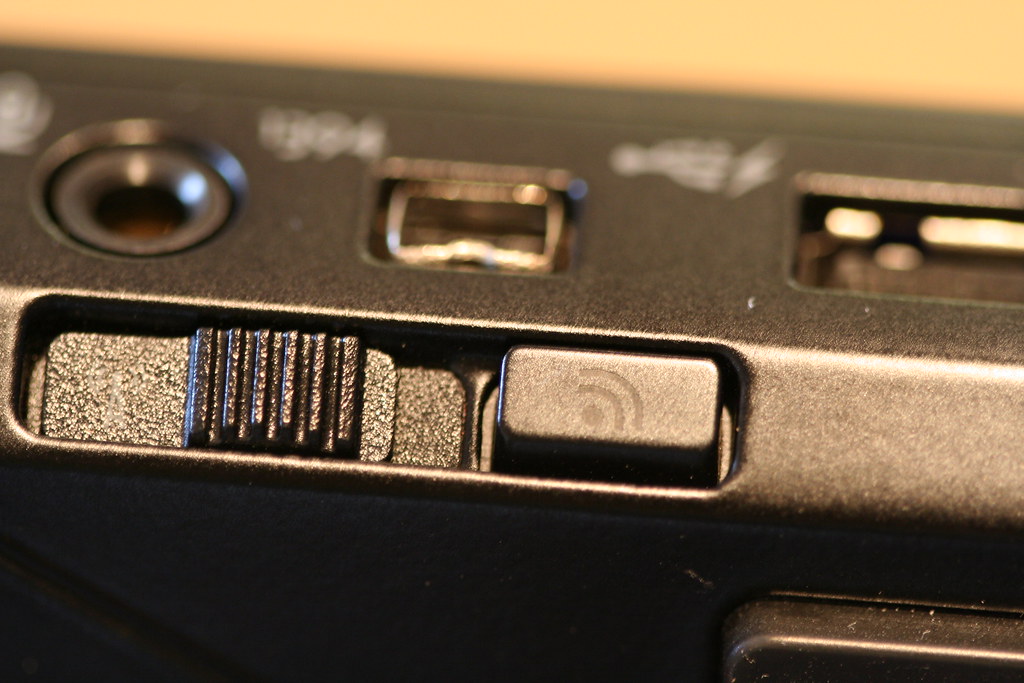
If your Windows 10 WiFi isn’t turning on, the first thing to check is if the WiFi switch on your laptop is turned on. To do this, locate the physical switch on your laptop that toggles the WiFi on and off.
Make sure the WiFi switch on your laptop is in the ‘on’ position. If it’s already in the ‘on’ position, toggle it off and then back on to reset the connection.
Once you’ve verified that the WiFi switch is on, check the taskbar on your laptop for the WiFi icon. If it’s not showing up, right-click on the taskbar and select ‘Taskbar settings’ to ensure that the WiFi icon is enabled.
If the WiFi icon is enabled but still not showing up, you may need to troubleshoot your WiFi connection further by checking your wireless router, modem, and internet service provider.
Ensure that your laptop is within range of the wireless router and that the router is functioning properly. You can also try restarting both your modem and router to see if that resolves the issue.
If you’re still experiencing WiFi connectivity issues, consider checking for any Windows updates that may address the problem. You can do this by clicking on the Start menu, selecting ‘Settings,’ and then ‘Update & Security.’
If all else fails, you may need to contact your internet service provider for further assistance or consider seeking help from a professional technician to diagnose and fix the problem. Remember to always backup your important files before troubleshooting any connectivity issues on your laptop.
Change Your Wireless Network Adapter Properties
- Open Device Manager by pressing Windows key + X and selecting Device Manager.
- Expand the Network adapters category and locate your wireless network adapter.
- Right-click on the wireless network adapter and select Properties.
- Go to the Power Management tab and uncheck the box that says “Allow the computer to turn off this device to save power.”
- Click OK to save the changes.
Update Network Adapter Driver
![]()
To update the network adapter driver in Windows 10 and fix the Wi-Fi turn on issue not showing, follow these steps:
– First, click on the Start menu and type “Device Manager” in the search bar.
– Click on Device Manager in the search results to open the window.
– In the Device Manager window, locate and expand the “Network adapters” section.
– Right-click on your network adapter and select “Update driver.”
– Choose the option to search automatically for updated driver software.
– Wait for Windows to search for and install the latest driver for your network adapter.
– Once the update is complete, restart your computer to apply the changes.
If the Wi-Fi turn on issue persists, you can also try manually updating the network adapter driver:
– Go to the manufacturer’s website of your network adapter and locate the latest driver for your specific model.
– Download the driver and save it to your computer.
– In the Device Manager window, right-click on your network adapter and select “Update driver.”
– Choose the option to browse my computer for driver software.
– Locate the downloaded driver on your computer and follow the on-screen instructions to install it.
– Restart your computer after the installation is complete.
If updating the network adapter driver does not resolve the issue, you can also try resetting the network settings:
– Click on the Start menu and go to Settings.
– Select Network & Internet.
– Scroll down and click on Network reset.
– Click on Reset now and confirm your choice.
– Restart your computer after the network reset is complete.
Uninstall and Reinstall Network Adapter Driver
To uninstall the network adapter driver, follow these steps:
1. Press the Windows key + X on your keyboard to open the Power User menu.
2. Click on Device Manager from the list of options.
3. In the Device Manager window, expand the Network adapters section.
4. Right-click on the network adapter that you are having issues with and select Uninstall device from the context menu.
5. Follow the on-screen instructions to complete the uninstallation process.
6. Restart your computer.
To reinstall the network adapter driver, follow these steps:
1. Press the Windows key + X on your keyboard to open the Power User menu.
2. Click on Device Manager from the list of options.
3. In the Device Manager window, click on the Action tab at the top.
4. Select Scan for hardware changes from the drop-down menu. This will automatically reinstall the network adapter driver.
5. Restart your computer.
By uninstalling and reinstalling the network adapter driver, you can refresh the connection and potentially fix the WiFi turn on issue not showing up on Windows 10. If the problem persists, you may need to troubleshoot further or seek additional help from a professional.
Run Network Adapter Troubleshooter
To fix the Windows 10 WiFi turn on issue not showing, you can try running the Network Adapter Troubleshooter. This built-in tool can help identify and resolve any problems with your network adapter.
1. Open the Settings app by pressing Windows key + I. Then, click on “Update & Security” and select “Troubleshoot” from the left-hand menu.
2. Scroll down and click on “Network Adapter.” Then, click on “Run the troubleshooter” and follow the on-screen instructions.
3. The troubleshooter will scan your network adapter for any issues. It will then attempt to fix any problems it finds.
If the troubleshooter is able to resolve the issue, you should now be able to turn on your WiFi without any problems. If the problem persists, you may need to try other troubleshooting steps or seek further assistance.
Consider a System Restore
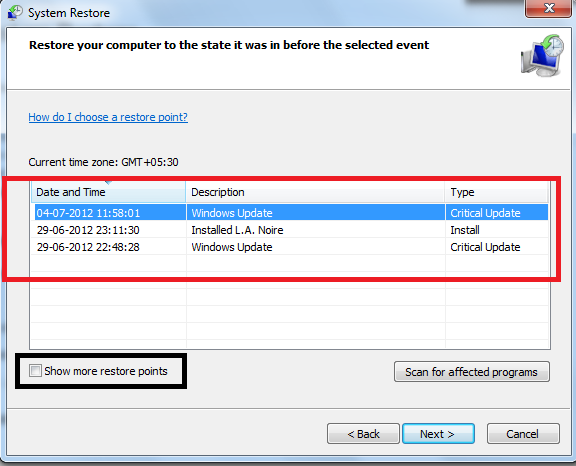
If you are experiencing issues with your Windows 10 WiFi not turning on or showing up, one potential solution to consider is performing a System Restore.
To initiate a System Restore on Windows 10, follow these steps:
1. Press the Windows key + R to open the Run dialog box.
2. Type “rstrui” and hit Enter to open the System Restore window.
3. Click on “Next” and select a restore point from the list provided.
4. Follow the on-screen instructions to complete the System Restore process.
Performing a System Restore can help revert your system back to a previous state where the WiFi was functioning properly. This can be helpful in resolving any software conflicts or issues that may be causing the WiFi problem.
After completing the System Restore, restart your computer and check if the WiFi is now turning on and showing up correctly. If the issue persists, you may need to consider other troubleshooting steps such as updating your network drivers or checking for any hardware issues with your WiFi adapter.
Remember to always back up your important files and data before performing a System Restore, as this process can potentially cause data loss. If you are unsure about initiating a System Restore or need further assistance, consider reaching out to Microsoft support or seeking help from online tech forums like Reddit.
Explore Additional Troubleshooting Options
| Additional Troubleshooting Options |
|---|
| 1. Restart Your Computer |
| 2. Update Wi-Fi Driver |
| 3. Run Network Troubleshooter |
| 4. Reset Network Settings |
| 5. Check for Windows Updates |
| 6. Disable and Re-enable Wi-Fi Adapter |
| 7. Disable Power Saving Mode for Wi-Fi Adapter |
F.A.Q.
Why is my laptop Wi-Fi not turning on in Windows 10?
Your laptop Wi-Fi may not be turning on in Windows 10 because of potential network issues. To troubleshoot this, you can access the Network troubleshooter by going to Start > Settings > Network & Internet > Status. Follow the steps provided in the troubleshooter to address and potentially resolve the problem.
Why is there no option to turn on Wi-Fi on my laptop?
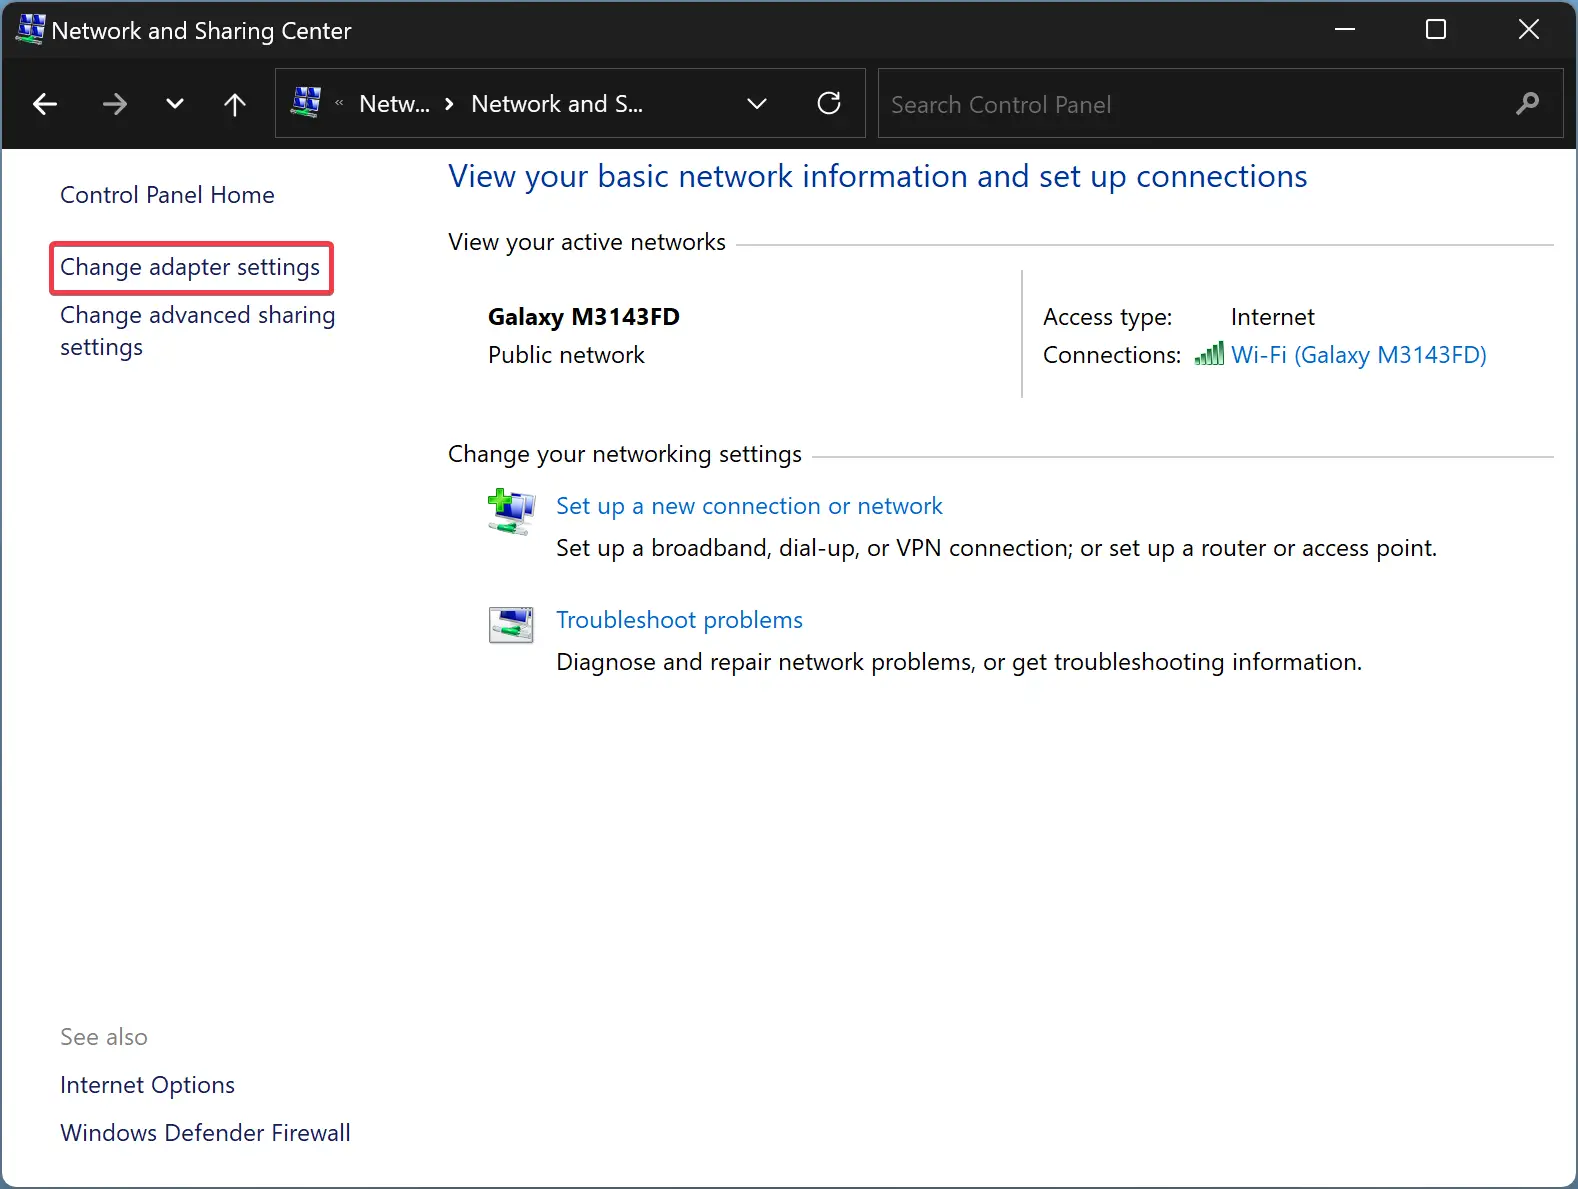
There is no option to turn on Wi-Fi on your laptop because the Wi-Fi adapter may be disabled. To enable it, go to Network and Sharing Center, click on Change adapter settings, right-click on the Wi-Fi adapter, and select Enabled.
How do I force my laptop to turn on Wi-Fi?
To force your laptop to turn on Wi-Fi, you can access the Network & Internet settings in the Control Panel. From there, enable the Wireless Network Connection option to activate Wi-Fi on your device.
How to fix Wi-Fi turned off in Windows 10?
To fix Wi-Fi turned off in Windows 10, you can go to the Network and Sharing Center, then click on Change adapter settings, and finally right-click on your wireless network adapter and select Enable.