Are you struggling with Gradle build errors in Android Studio? Let’s explore some potential solutions to get your project back on track.
Sync Project with Gradle Files
If you encounter any errors during the sync process, you can try cleaning the project by going to “Build” > “Clean Project” and then syncing the project again. This can help resolve any issues caused by cached files or outdated dependencies.
Additionally, you can check the classpath in the Gradle files to ensure that all necessary libraries and dependencies are properly specified.
If the issue persists, you may need to check for any conflicts with plug-ins or compilers in the Gradle files.
Reinstalling Gradle Files
To reinstall Gradle files in Android Studio, follow these steps. First, navigate to the Android Studio project directory in your file explorer. Look for the “gradle” folder and delete it. Then, open Android Studio and go to File > Invalidate Caches / Restart.
Next, click on “File” and then “Sync Project with Gradle Files. ” This will prompt Android Studio to download the necessary Gradle files for the project. Finally, rebuild the project by clicking on “Build” in the top menu and then selecting “Rebuild Project. ” This should resolve any Gradle build errors you were experiencing.
If the issue persists, consider checking for any errors in your Gradle build files or seeking assistance from the Android Studio community.
Troubleshooting Internet Connectivity Issues
If you are experiencing internet connectivity issues while trying to fix Android Studio Gradle build error, there are a few troubleshooting steps you can take. First, check your internet connection to ensure it is stable and working properly. You can do this by trying to access other websites or apps on your device.
If your internet connection is working fine, try restarting Android Studio and your computer to see if that resolves the issue. Sometimes, simply resetting your devices can help to clear up any temporary glitches or errors.
If the problem persists, you can also try clearing the cache in Android Studio. To do this, navigate to the “File” menu and select “Invalidate Caches / Restart.” This will clear out any temporary files or data that may be causing the connectivity issue.
If none of these steps solve the problem, you may want to consider reaching out to your internet service provider for further assistance. They may be able to help diagnose any underlying issues with your connection that could be affecting Android Studio.
Disabling Proxy Settings
To disable proxy settings in Android Studio and fix Gradle build errors, follow these steps:
1. First, open Android Studio and go to File > Settings.
2. In the Settings window, navigate to Appearance & Behavior > System Settings > HTTP Proxy.
3. Select the ‘No proxy’ option and click ‘OK’ to save the changes.
4. If you’re still experiencing build errors, you may need to check your system-wide proxy settings as well.
5. On your Android device, go to Settings > Wi-Fi, long press on the connected network, and select ‘Modify network’.
6. Check the ‘Show advanced options’ box and change the Proxy settings to ‘None’.
7. After making these changes, try rebuilding your project in Android Studio to see if the error has been resolved.
Updating Android SDK Packages
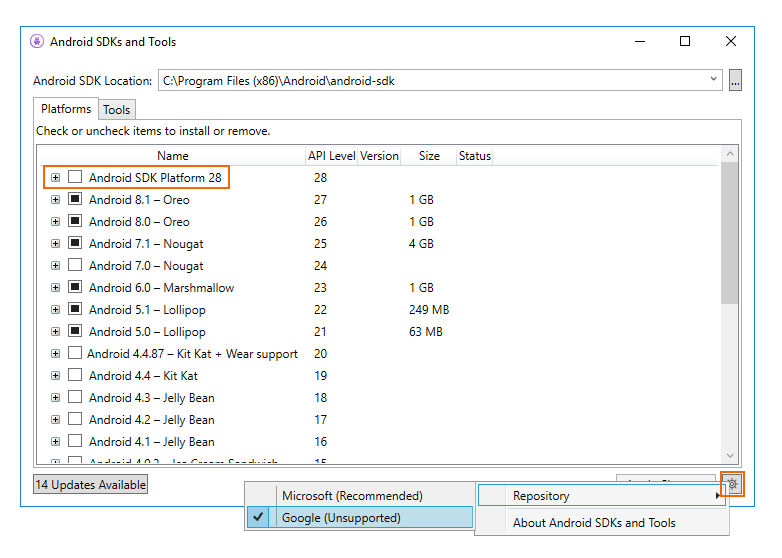
To update Android SDK packages in Android Studio and fix Gradle build errors, you can follow these steps. First, open Android Studio and go to Tools > SDK Manager. In the SDK Manager, go to the SDK Tools tab and check for any updates available for the Android SDK tools. If there are updates available, select them and click on the “Apply” button to update the SDK packages.
After updating the SDK packages, you may need to sync your project with the updated SDK. To do this, go to File > Sync Project with Gradle Files. This will ensure that your project is using the updated SDK packages.
If you are still facing Gradle build errors after updating the SDK packages, you can also try cleaning and rebuilding your project. To do this, go to Build > Clean Project and then Build > Rebuild Project. This will clean the project and rebuild it using the updated SDK packages, which may help resolve any build errors.
Addressing Android Studio Known Issues
If you are encountering a Gradle build error in Android Studio, it could be due to a known issue. One common issue is related to the version of Gradle being used. To fix this, check your Gradle version and upgrade it to the latest version if necessary. Another known issue is related to the project’s classpath. To address this, check your project’s build.
gradle file and ensure that the classpath is correctly configured. Additionally, issues with cache or corrupted files can cause build errors. In such cases, clear the cache and rebuild the project. Finally, if the error persists, try updating Android Studio to the latest version. These steps should help resolve the Gradle build error in Android Studio.
Resolving Firebase Assistant Window Errors
To resolve Firebase Assistant window errors in Android Studio, there are a few steps you can take. First, ensure that you have the latest version of Google Play services and Google Repository installed in the Android SDK Manager. If you’re still encountering errors, you may need to manually install the Firebase plugin.
To do this, go to Tools > Firebase and click on the Assistant tab. If you see an error message, click on the “Install Firebase Plugin” button. If the plugin installation is successful, you should no longer see the error message in the Firebase Assistant window.
If you’re still having issues, try clearing the cache and restarting Android Studio. You can also try updating Android Studio to the latest version, as this may resolve any compatibility issues with Firebase.
Handling Compose Preview and Layout Inspector Problems
When encountering problems with Compose Preview and Layout Inspector in Android Studio, it’s important to troubleshoot and resolve these issues to ensure a smooth gradle build process. If you’re experiencing issues with the Compose Preview, try clearing the cache and restarting Android Studio. This can often resolve rendering problems and refresh the preview. Additionally, ensure that you have the latest version of the Compose library and that your layout XML files are correctly formatted.
For Layout Inspector problems, consider taking a screenshot of the issue and seeking help from the Android Studio community or support forums. Sometimes, issues with the Layout Inspector can be related to specific configurations or device settings, so it’s important to gather information about the problem and share it with others who may be able to assist.
By addressing Compose Preview and Layout Inspector problems, you can streamline your Android Studio gradle build process and focus on developing your mobile app without interruptions.
Fixing Incremental Update Issues on macOS
If you’re facing incremental update issues on macOS while using Android Studio, there are a few steps you can take to resolve the issue.
First, make sure you have the latest version of Android Studio installed on your computer. This can often solve many update-related problems.
If you’re still experiencing issues, try clearing the cache in Android Studio. Sometimes, corrupted cache files can cause update problems.
You can also try restarting your computer to see if that resolves the issue.
If none of these steps work, you may need to reinstall Android Studio on your macOS. This can be a more time-consuming solution, but it often resolves persistent update issues.
Debugging and Profiler Timeout Errors
When encountering debugging and profiler timeout errors in Android Studio Gradle build, there are a few steps you can take to resolve them. First, check for any issues with your code or dependencies that could be causing the errors. Use the debugger and profiler tools to identify the specific source of the timeout error. If the issue persists, you can try increasing the timeout value in the Gradle build settings. Additionally, clearing the cache and restarting Android Studio can also help resolve these errors. If all else fails, consider seeking help from online forums or communities for further assistance.
Updating Gradle Plugin and Kotlin Compatibility
To update the Gradle plugin and ensure compatibility with Kotlin in Android Studio, follow these steps:
1. First, check for the latest version of the Gradle plugin and Kotlin compatibility.
2. Open your Android Studio project and go to the build.gradle file.
3. Update the Gradle plugin version to the latest available by changing the classpath in the build.gradle file to com.android.tools.build:gradle:latest_version.
4. Next, update the Kotlin compatibility by adding or changing the Kotlin plugin version in the build.gradle file to org.jetbrains.kotlin:kotlin-gradle-plugin:latest_version.
5. After making these changes, sync your project with the updated Gradle files.
6. Finally, rebuild your project to ensure that the Gradle build error is fixed.